Welcome to the GitHub Copilot Workshop! In this workshop, you will learn how to use GitHub Copilot to explain and improve code. GitHub Copilot Chat enables interactive dialogue with AI through a chat experience. Let's learn how to use GitHub Copilot through this workshop!

Today's Goals
- Understand the various features of GitHub Copilot
- Develop a new application using agent mode
Prerequisites
- Visual Studio Code is installed
- GitHub Copilot license is available
- GitHub account is available
This workshop uses the following GitHub repository:
Project URL: https://github.com/moulongzhang/2025-Github-Copilot-Workshop-Python
Step 1: Fork the Repository
First, open the project URL above in your browser and fork the repository:
- Open the project URL (https://github.com/moulongzhang/2025-Github-Copilot-Workshop-Python) in your browser
- Click the Fork button in the top right
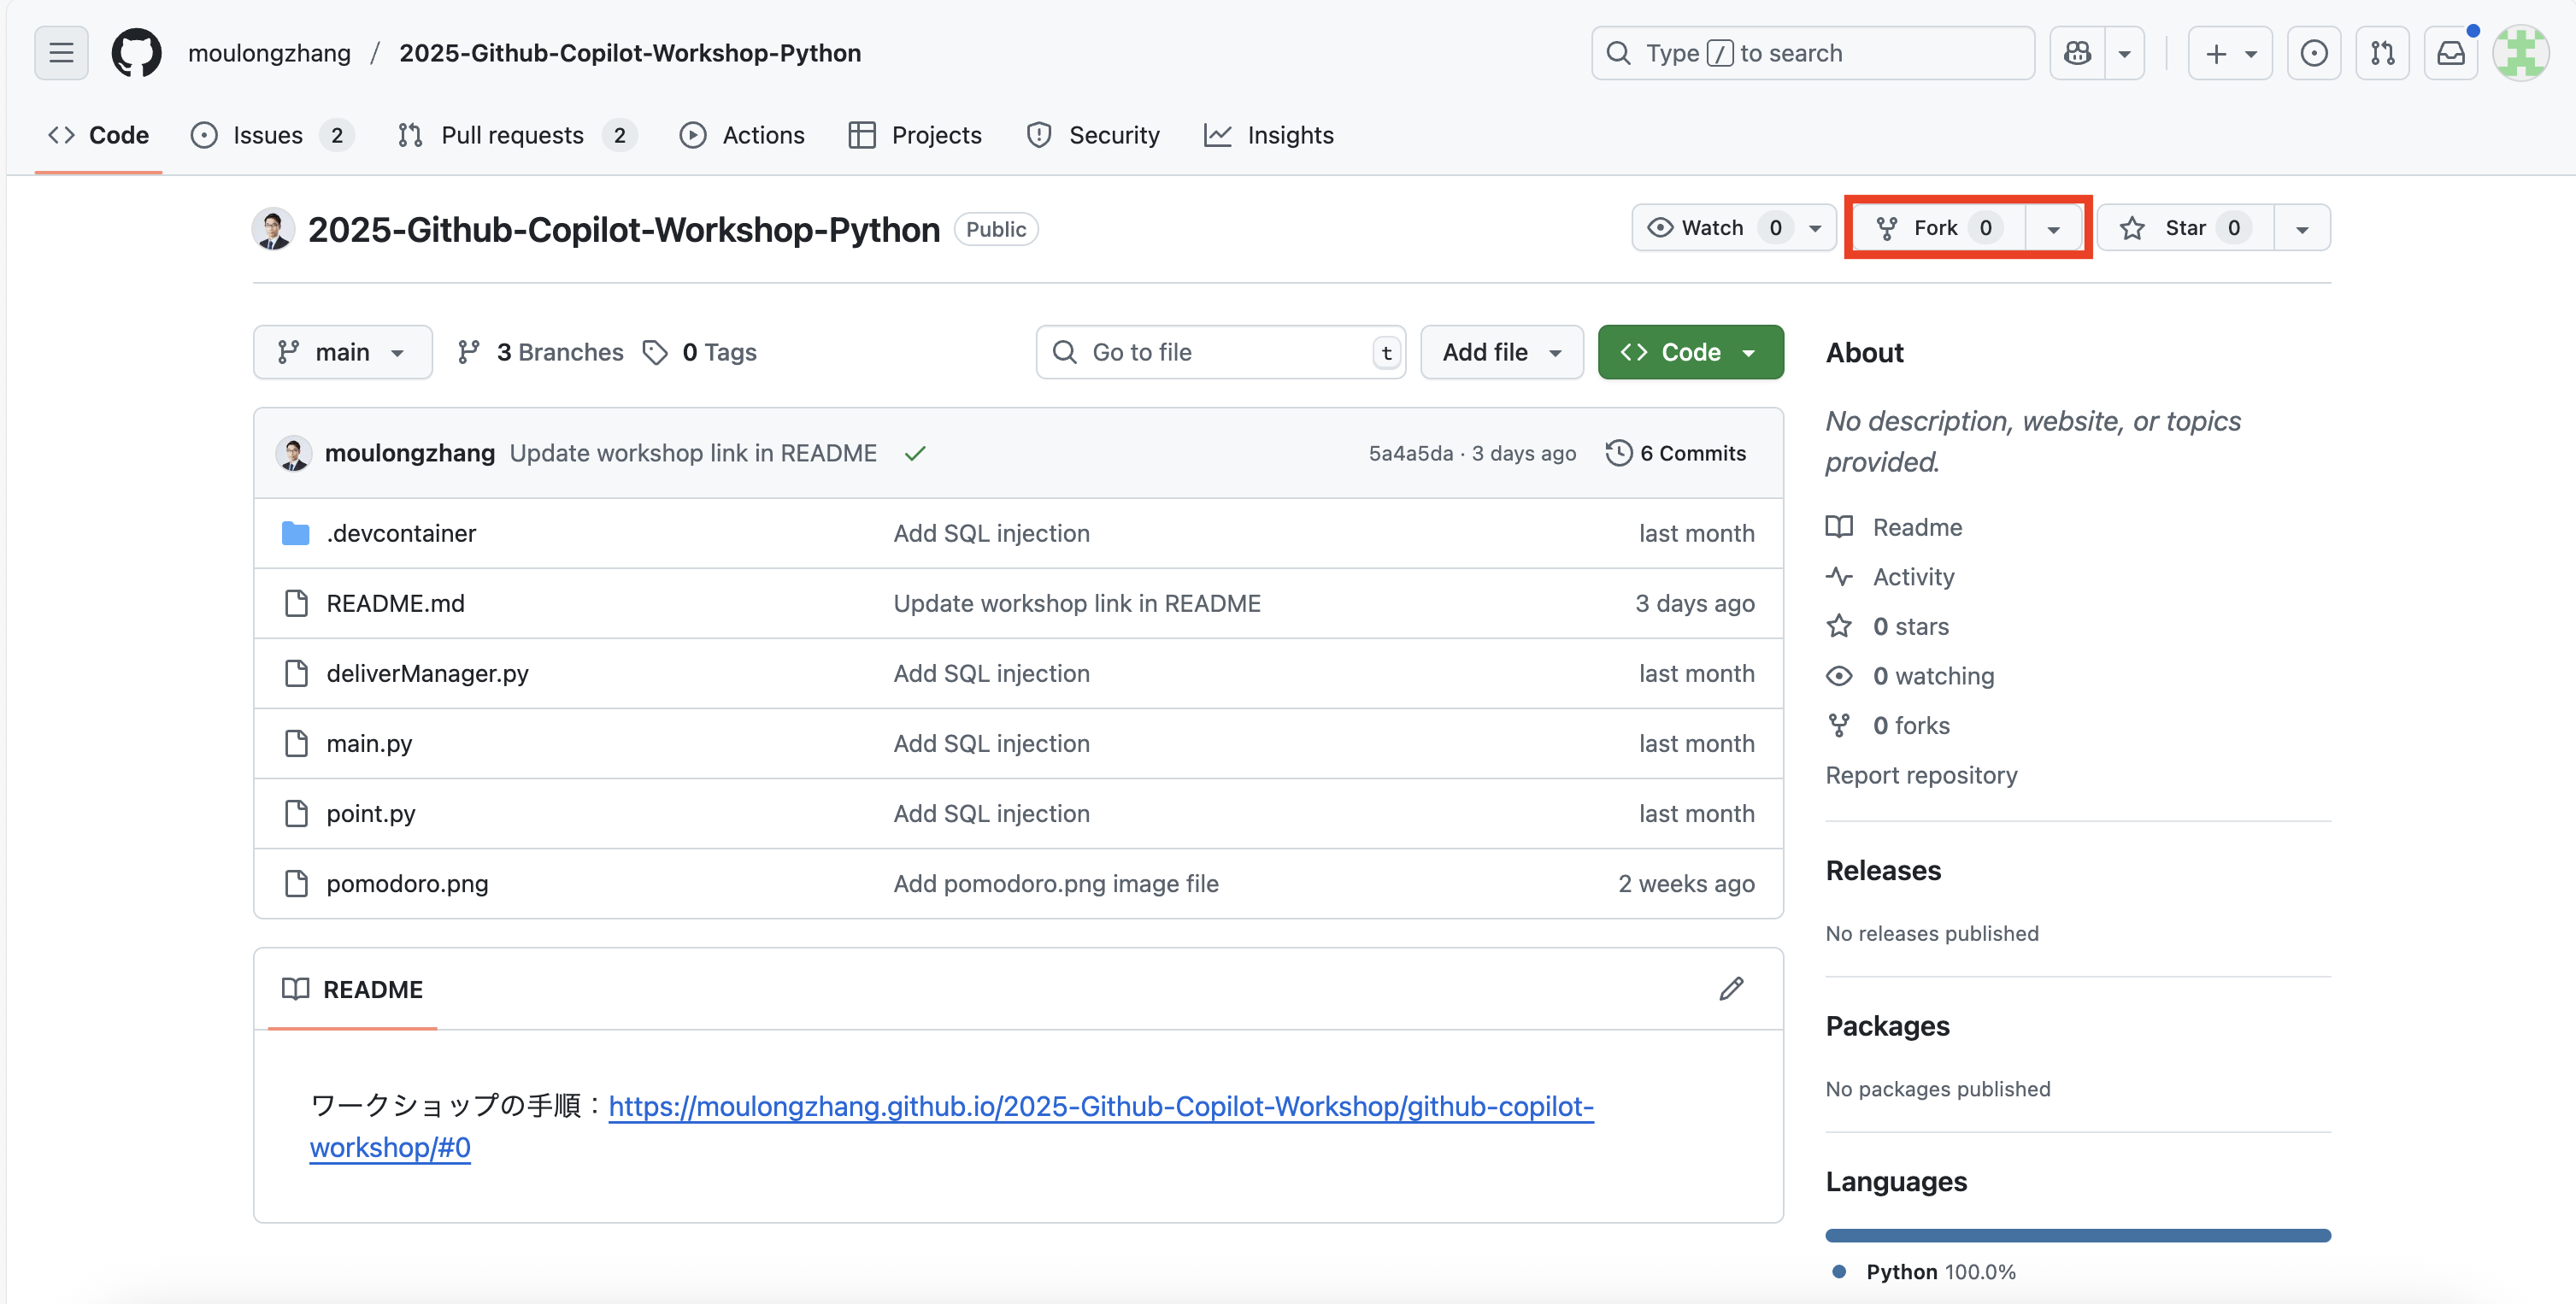
- Click the Create fork button on the fork creation screen
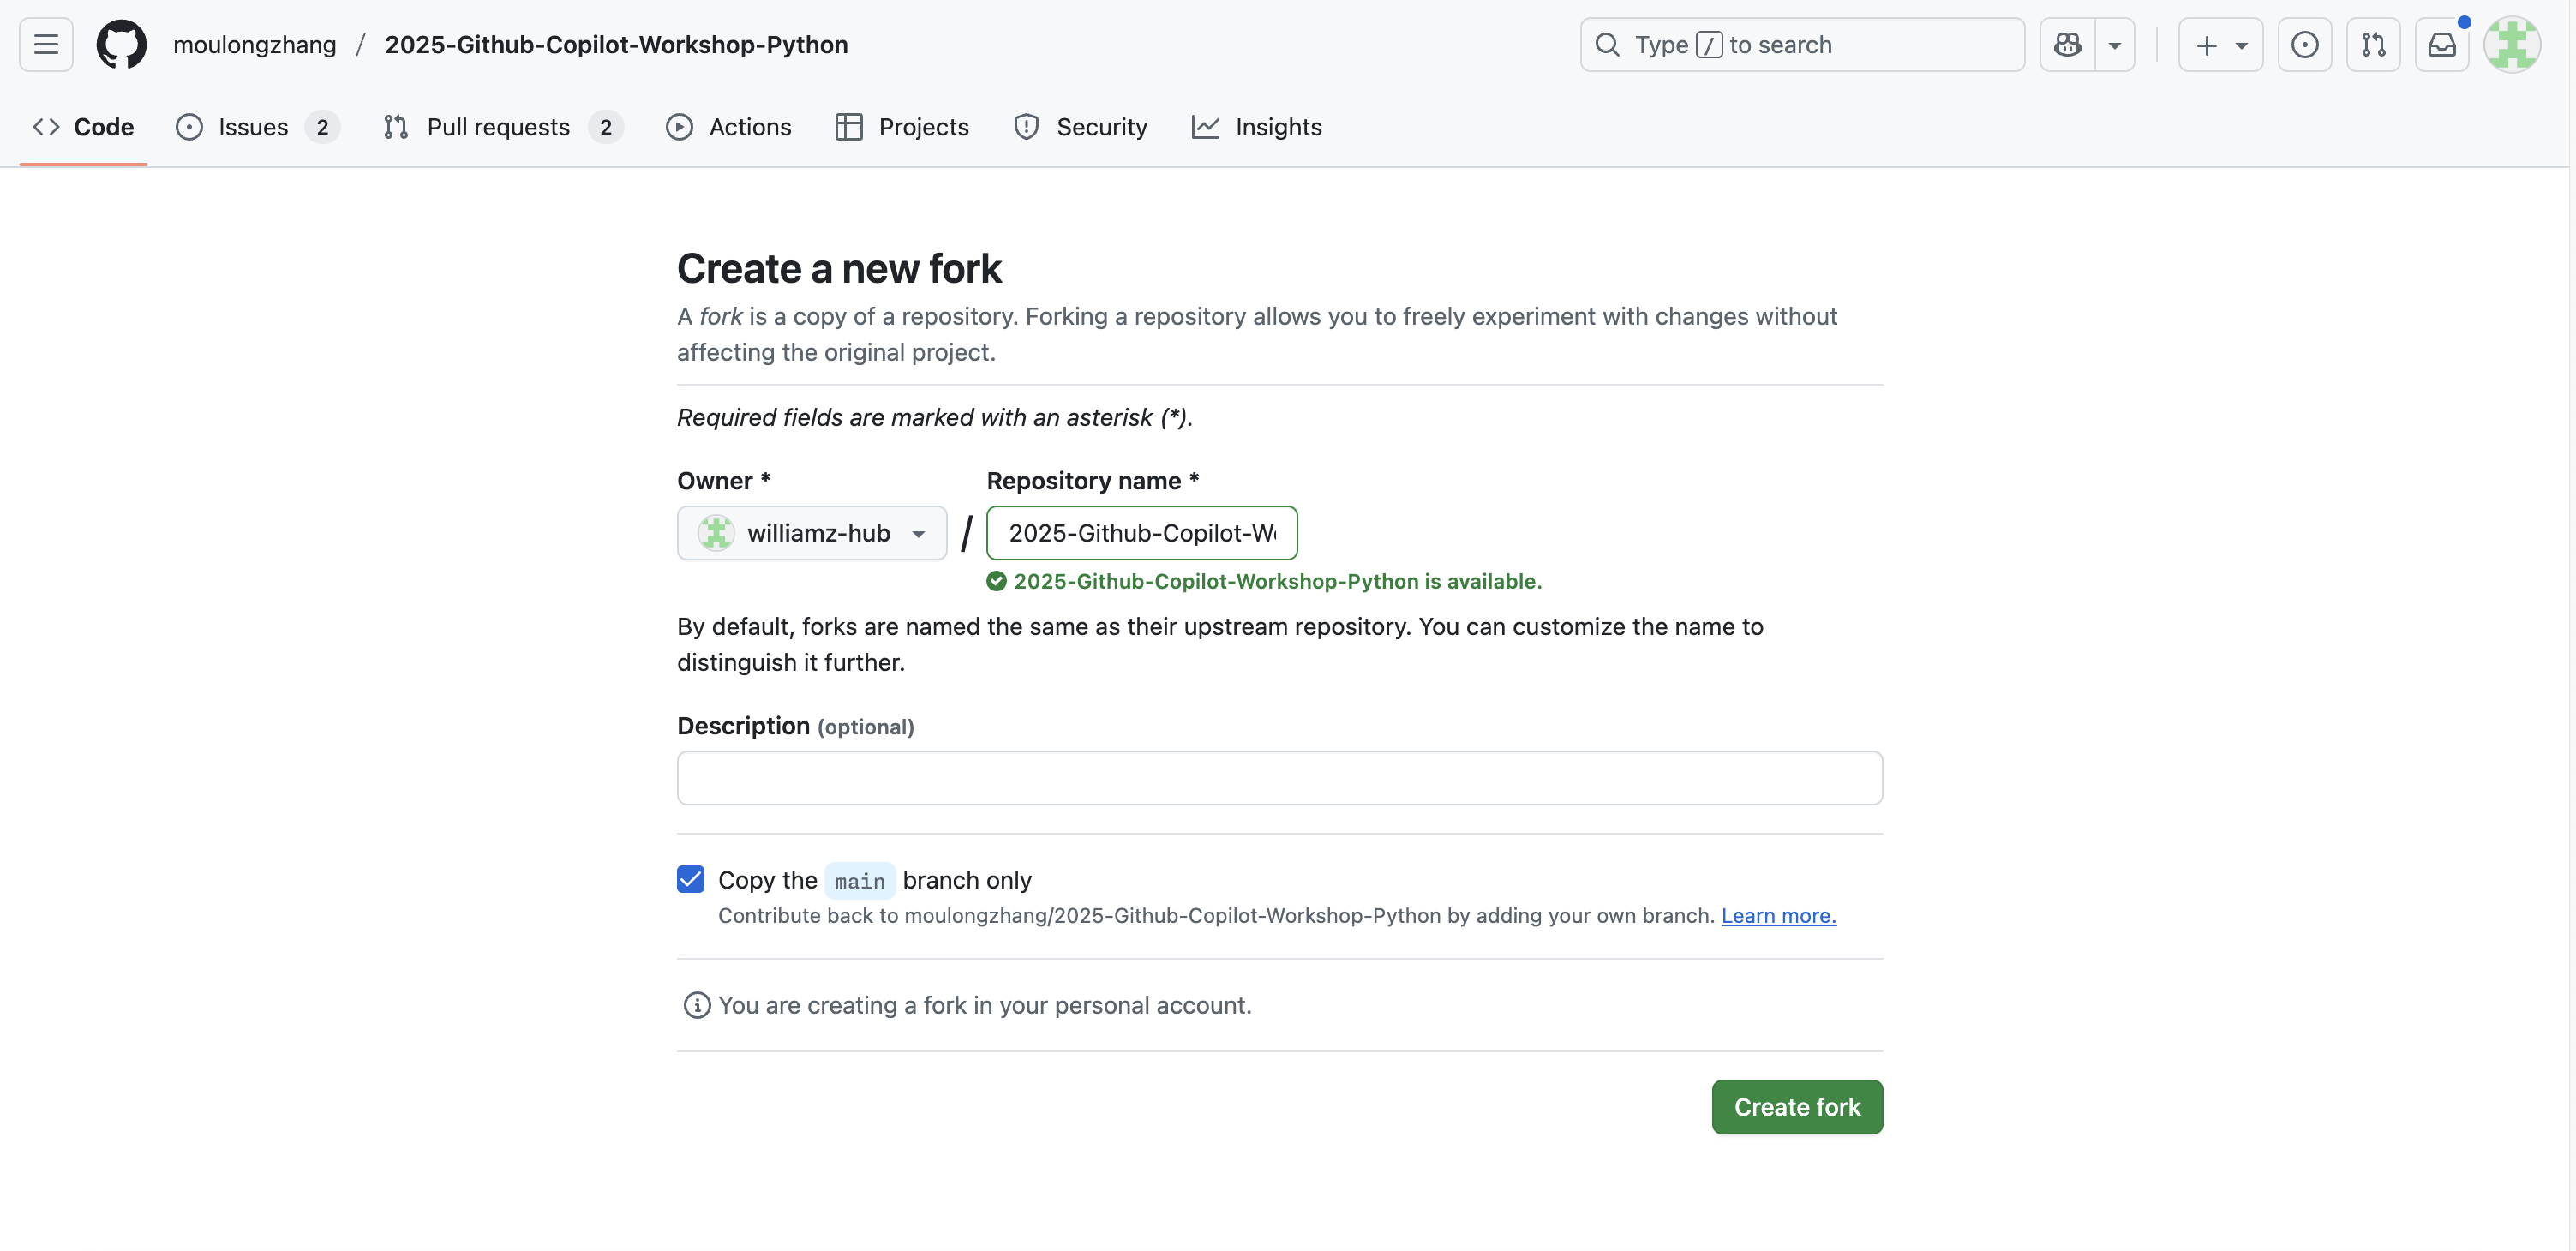
Once the fork is complete, a copy of the repository will be created in your GitHub account.
Step 2: Development Environment Setup
Using your forked repository, you can start the project using one of the following methods:
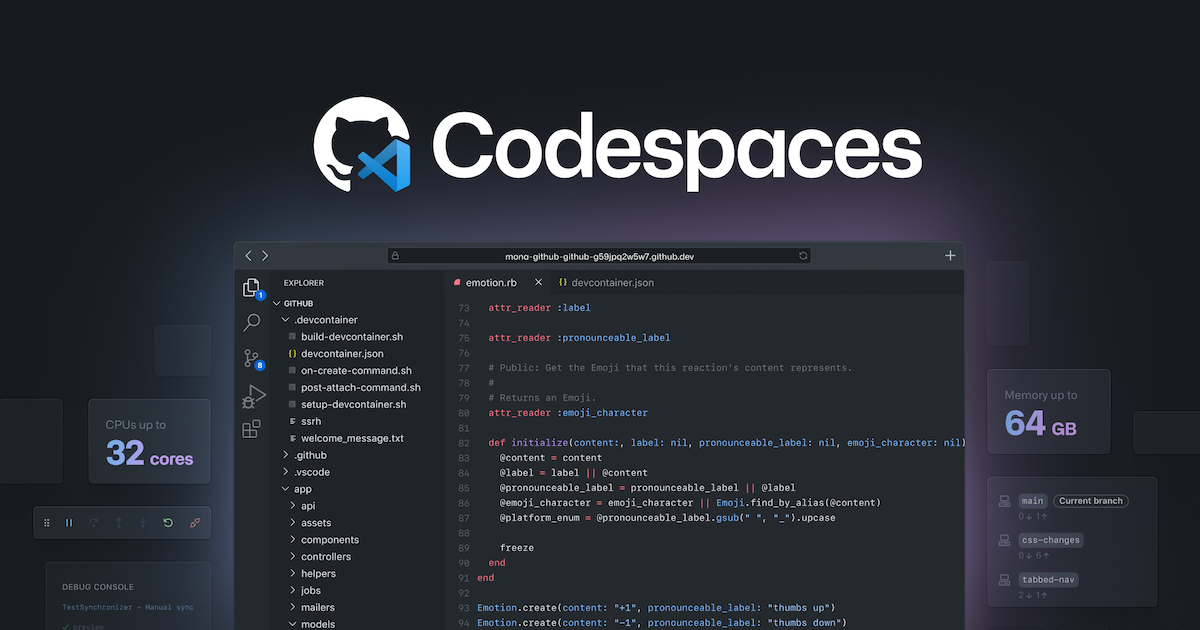
Method A: Use GitHub Codespaces (Recommended)
- On your forked repository page (
https://github.com/[your-username]/2025-Github-Copilot-Workshop-Python) - Click the green Code button
- Select the Codespaces tab
- Click Create codespace on main
Method B: Clone to Local Environment
If you have VS Code installed locally:
- Open Terminal or Command Prompt
- Clone your forked repository with the following command:
git clone https://github.com/[your-username]/2025-Github-Copilot-Workshop-Python.git
- Navigate to the cloned directory:
cd 2025-Github-Copilot-Workshop-Python
- Open the project in VS Code:
code .
Step 3: Install Required Extensions
After opening the project, please install the following extensions:
- Install GitHub Copilot extension
- Install GitHub Copilot Chat extension
- Install Python extension
Step 4: Configuration Check
- Confirm that you are signed in to your GitHub account in VS Code
- Confirm that Copilot functionality is enabled
- Confirm that the Python interpreter is set up correctly
Let's experience GitHub Copilot's basic code completion functionality.
Install Copilot Extensions
- Install GitHub Copilot extension
- Install GitHub Copilot Chat extension
Configuration Check
Make sure you are signed in to VS Code.
Try Code Completion
Create a new Python file and enter the following comment:
# Function to calculate Fibonacci sequence
def fibonacci(n):
Verify that Copilot automatically suggests code.
Overview
⚙️ github.copilot.nextEditSuggestions.enabled is a setting that enables GitHub Copilot's next-generation edit suggestion feature. This feature allows you to receive more advanced code editing suggestions.
1. Open VS Code
2. Access Settings
Open the settings screen using one of the following methods:
Method A: From Menu
- Windows/Linux:
File→Preferences→Settings - macOS:
Code→Settings...→Settings
Method B: Keyboard Shortcut
- Windows/Linux:
Ctrl + , - macOS:
Cmd + ,
Method C: Command Palette
Ctrl + Shift + P(Windows/Linux) orCmd + Shift + P(macOS)- Select
Preferences: Open Settings (UI)
3. Search Settings
Enter the following in the settings search box:
github.copilot.nextEditSuggestions.enabled
4. Enable Setting
- Check the checkbox for the setting item shown in search results
- Or change
falsetotrue
5. Confirm Setting
Verify the setting is correctly applied:
- Restart VS Code (recommended)
- Edit code in the editor and confirm the new suggestion feature works
Alternative Method: Direct Edit in settings.json
1. Open settings.json file
Ctrl + Shift + P(Windows/Linux) orCmd + Shift + P(macOS)- Select
Preferences: Open User Settings (JSON)
2. Add Setting
{
    "github.copilot.nextEditSuggestions.enabled": true
}
3. Save File
Ctrl + S(Windows/Linux) orCmd + S(macOS)
Let's Try It Out
Open the point.py file included in the project. This file contains a class representing points in two-dimensional space:
import math

class Point2D:
    def __init__(self, x, y):
        self.x = x
        self.y = y

    def distance_to(self, other):
        dx = self.x - other.x
        dy = self.y - other.y
        return math.sqrt(dx * dx + dy * dy)

    def __str__(self):
        return f"Point2D({self.x}, {self.y})"
Now, we want to extend this class to represent points in three-dimensional space. First, let's manually change the class name to Point3D. GitHub Copilot will then suggest the next edit candidates.
The suggestions should show changes like:
- Adding
zparameter to the__init__method - Adding
self.z = z - Extending the
distance_tomethod for three-dimensional distance calculation - Displaying z coordinate in the
__str__method
In this state, pressing the Tab key will move the cursor to the location where GitHub Copilot is making suggestions. To accept the suggestion, press the Tab key again.
GitHub Copilot should then suggest the next edit candidate. This suggestion can also be accepted by pressing the Tab key. Using Next Edit Suggestion allows you to edit code efficiently.
Let's See the Results
Let's continue extending the Point2D class to Point3D. You should be able to adapt all methods for three-dimensional space.
Expected final code example:
import math

class Point3D:
    def __init__(self, x, y, z):
        self.x = x
        self.y = y
        self.z = z

    def distance_to(self, other):
        dx = self.x - other.x
        dy = self.y - other.y
        dz = self.z - other.z
        return math.sqrt(dx * dx + dy * dy + dz * dz)

    def __str__(self):
        return f"Point3D({self.x}, {self.y}, {self.z})"
Let's Also Try with TODO Comments
Replace 2D (two-dimensional) with 3D (three-dimensional) in the commented first line.
# Class representing points in three-dimensional space
class Point2D:
    def __init__(self, x, y):
        self.x = x
        self.y = y

    def distance_to(self, other):
        # TODO: Add distance calculation code here
        pass

    def __str__(self):
        # TODO: Return string representation
        pass
Place the cursor after the TODO comments and check Copilot's suggestions.
Important Notes
- Make sure VS Code's GitHub Copilot extension is updated to the latest version
- Restarting VS Code is recommended after setting changes
Troubleshooting
If Settings Are Not Found
- Confirm GitHub Copilot extension is installed
- Confirm extension is updated to the latest version
- Restart VS Code and try again
If Functionality Doesn't Work
- Confirm you are logged in to GitHub Copilot
- Check internet connection
- Check VS Code console for error messages
Create File
Please save the following file as delivery_manager.py.
import time
import random
from typing import List, Callable, Optional
from dataclasses import dataclass, field
from enum import Enum


class EventArgs:
    """Base class for event arguments"""
    pass


class Event:
    """Class equivalent to C#'s event"""

    def __init__(self):
        self._handlers: List[Callable] = []

    def add_handler(self, handler: Callable):
        """Add event handler"""
        if handler not in self._handlers:
            self._handlers.append(handler)

    def remove_handler(self, handler: Callable):
        """Remove event handler"""
        if handler in self._handlers:
            self._handlers.remove(handler)

    def invoke(self, sender, args: EventArgs = None):
        """Fire event"""
        for handler in self._handlers:
            handler(sender, args or EventArgs())


@dataclass
class KitchenObjectSO:
    """Kitchen object data class"""
    name: str
    object_id: int


@dataclass
class RecipeSO:
    """Recipe data class"""
    name: str
    kitchen_object_so_list: List[KitchenObjectSO] = field(default_factory=list)


@dataclass
class RecipeListSO:
    """Recipe list data class"""
    recipe_so_list: List[RecipeSO] = field(default_factory=list)


class PlateKitchenObject:
    """Plate kitchen object"""

    def __init__(self):
        self._kitchen_object_so_list: List[KitchenObjectSO] = []

    def add_kitchen_object(self, kitchen_object: KitchenObjectSO):
        """Add kitchen object"""
        self._kitchen_object_so_list.append(kitchen_object)

    def get_kitchen_object_so_list(self) -> List[KitchenObjectSO]:
        """Get kitchen object list"""
        return self._kitchen_object_so_list.copy()


class KitchenGameManager:
    """Kitchen game manager (Singleton)"""

    _instance: Optional['KitchenGameManager'] = None

    def __init__(self):
        self._is_game_playing = False

    @classmethod
    def get_instance(cls) -> 'KitchenGameManager':
        """Get Singleton instance"""
        if cls._instance is None:
            cls._instance = cls()
        return cls._instance

    def is_game_playing(self) -> bool:
        """Check if game is in progress"""
        return self._is_game_playing

    def start_game(self):
        """Start game"""
        self._is_game_playing = True

    def stop_game(self):
        """Stop game"""
        self._is_game_playing = False


class DeliveryManager:
    """Delivery management class (Python version)"""

    _instance: Optional['DeliveryManager'] = None

    def __init__(self, recipe_list_so: RecipeListSO):
        # Event definitions
        self.on_recipe_spawned = Event()
        self.on_recipe_completed = Event()
        self.on_recipe_success = Event()
        self.on_recipe_failed = Event()

        # Private variables
        self._recipe_list_so = recipe_list_so
        self._waiting_recipe_so_list: List[RecipeSO] = []
        self._spawn_recipe_timer = 0.0
        self._spawn_recipe_timer_max = 4.0
        self._waiting_recipes_max = 4
        self._successful_recipes_amount = 0
        self._last_update_time = time.time()

    @classmethod
    def get_instance(cls, recipe_list_so: RecipeListSO = None) -> 'DeliveryManager':
        """Get Singleton instance"""
        if cls._instance is None:
            if recipe_list_so is None:
                raise ValueError("recipe_list_so is required for initial creation")
            cls._instance = cls(recipe_list_so)
        return cls._instance

    def update(self):
        """Frame update processing (equivalent to Unity's Update)"""
        current_time = time.time()
        delta_time = current_time - self._last_update_time
        self._last_update_time = current_time

        self._spawn_recipe_timer -= delta_time

        if self._spawn_recipe_timer <= 0.0:
            self._spawn_recipe_timer = self._spawn_recipe_timer_max

            kitchen_game_manager = KitchenGameManager.get_instance()
            if (kitchen_game_manager.is_game_playing() and
                len(self._waiting_recipe_so_list) < self._waiting_recipes_max):

                # Randomly select recipe
                waiting_recipe_so = random.choice(self._recipe_list_so.recipe_so_list)
                self._waiting_recipe_so_list.append(waiting_recipe_so)

                # Fire event
                self.on_recipe_spawned.invoke(self)

    def deliver_recipe(self, plate_kitchen_object: PlateKitchenObject):
        """Check if recipe ingredients match plate ingredients"""

        for i, waiting_recipe_so in enumerate(self._waiting_recipe_so_list):
            plate_ingredients = plate_kitchen_object.get_kitchen_object_so_list()

            # Check if ingredient counts match
            if len(waiting_recipe_so.kitchen_object_so_list) == len(plate_ingredients):
                plate_contents_matches_recipe = True

                # Check each recipe ingredient
                for recipe_kitchen_object_so in waiting_recipe_so.kitchen_object_so_list:
                    ingredient_found = False

                    # Match with plate ingredients
                    for plate_kitchen_object_so in plate_ingredients:
                        if plate_kitchen_object_so == recipe_kitchen_object_so:
                            ingredient_found = True
                            break

                    if not ingredient_found:
                        plate_contents_matches_recipe = False
                        break

                # If ingredients match completely
                if plate_contents_matches_recipe:
                    self._successful_recipes_amount += 1
                    self._waiting_recipe_so_list.pop(i)

                    # Fire success events
                    self.on_recipe_completed.invoke(self)
                    self.on_recipe_success.invoke(self)
                    return

        # If no matching recipe found
        self.on_recipe_failed.invoke(self)

    def get_waiting_recipe_so_list(self) -> List[RecipeSO]:
        """Get waiting recipe list"""
        return self._waiting_recipe_so_list.copy()

    def get_successful_recipes_amount(self) -> int:
        """Get number of successful recipes"""
        return self._successful_recipes_amount


# Usage example
if __name__ == "__main__":
    # Create sample data
    tomato = KitchenObjectSO("Tomato", 1)
    lettuce = KitchenObjectSO("Lettuce", 2)
    bread = KitchenObjectSO("Bread", 3)

    # Sample recipes
    sandwich_recipe = RecipeSO("Sandwich", [bread, lettuce, tomato])
    salad_recipe = RecipeSO("Salad", [lettuce, tomato])

    recipe_list = RecipeListSO([sandwich_recipe, salad_recipe])

    # Initialize game manager and delivery manager
    game_manager = KitchenGameManager.get_instance()
    game_manager.start_game()

    delivery_manager = DeliveryManager.get_instance(recipe_list)

    # Set up event handlers
    def on_recipe_spawned(sender, args):
        print("New recipe has been generated!")

    def on_recipe_success(sender, args):
        print("Recipe delivery successful!")

    def on_recipe_failed(sender, args):
        print("Recipe delivery failed...")

    delivery_manager.on_recipe_spawned.add_handler(on_recipe_spawned)
    delivery_manager.on_recipe_success.add_handler(on_recipe_success)
    delivery_manager.on_recipe_failed.add_handler(on_recipe_failed)

    # Sample execution
    print("Game starting...")

    # Run update process for 5 seconds
    start_time = time.time()
    while time.time() - start_time < 5:
        delivery_manager.update()
        time.sleep(0.1)  # Update every 100ms

    print(f"Number of waiting recipes: {len(delivery_manager.get_waiting_recipe_so_list())}")

    # Sample delivery test
    plate = PlateKitchenObject()
    plate.add_kitchen_object(bread)
    plate.add_kitchen_object(lettuce)
    plate.add_kitchen_object(tomato)

    print("Delivering sandwich...")
    delivery_manager.deliver_recipe(plate)

    print(f"Number of successful recipes: {delivery_manager.get_successful_recipes_amount()}")
Let's have Copilot Chat explain this code.
Open Copilot Chat
- Click the Chat icon (chat bubble icon) in the VS Code sidebar to open Copilot Chat
- Or open the Chat panel with
Ctrl+Alt+I(on macOSCtrl+Cmd+I)
Check Chat Mode
Confirm the chat mode is set to "Question" (we'll introduce "Agent" mode later).
Request File Explanation
- Enter
#delivery_manager.pyin the chat field - Enter the prompt "Please explain this entire file."
- Press Enter and Copilot Chat will explain the entire
delivery_manager.pyfile
Exercise
Let's ask Copilot Chat about the problematic parts of this code.
1. Ask About Overall Class Issues
First, let's ask what problems this code has as a whole class.
Ask Copilot Chat:
Looking at this entire DeliveryManager class, what problems and improvement points are there? Please tell me from the perspectives of design patterns, code quality, and maintainability.
2. Focus on Specific Methods for Improvement Points
Next, let's focus on the deliver_recipe() method and ask what methods exist to improve this method.
Steps:
- Enter
#deliver_recipein the chat field - Candidates for code elements (functions, classes, variables, etc.) will be displayed
- Select the
deliver_recipemethod - Enter the following question:
What methods are there to improve this deliver_recipe method? Please make suggestions from the perspectives of readability, performance, and error handling.
Code Review Function
To improve the current code, ask Copilot Chat:
Please improve this Python code. I'd like suggestions from the perspectives of performance, readability, and error handling.
Check from Security Perspective
Are there any security issues with this code?
Check Best Practices
Please check if this follows Python best practices.
So far we've been using Copilot Chat in "Question" mode, but now let's try "Agent" mode. Agents can understand user intent and execute tasks more autonomously. Through practical examples, we'll learn how agents function.
Switch to Agent Mode
First, with the delivery_manager.py file open, select "Agent" from the mode selection in Copilot Chat.


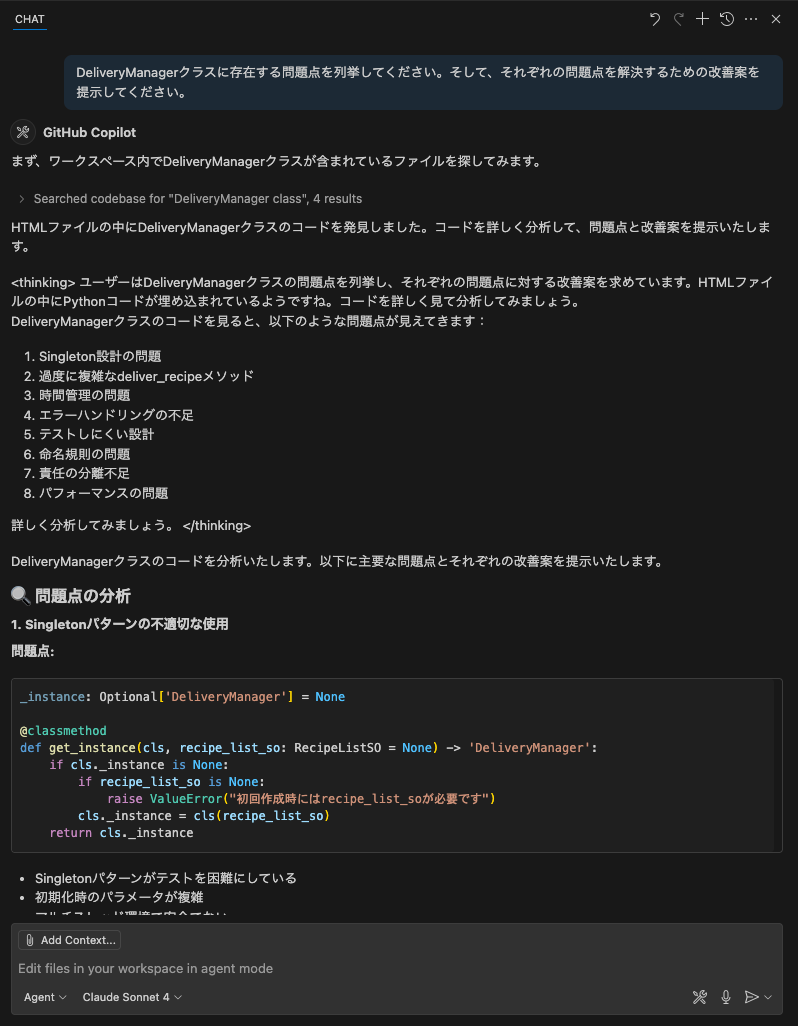
Identify Issues
Then, enter the following prompt:
Please list the issues that exist in the DeliveryManager class. Then, present improvement plans to solve each issue.
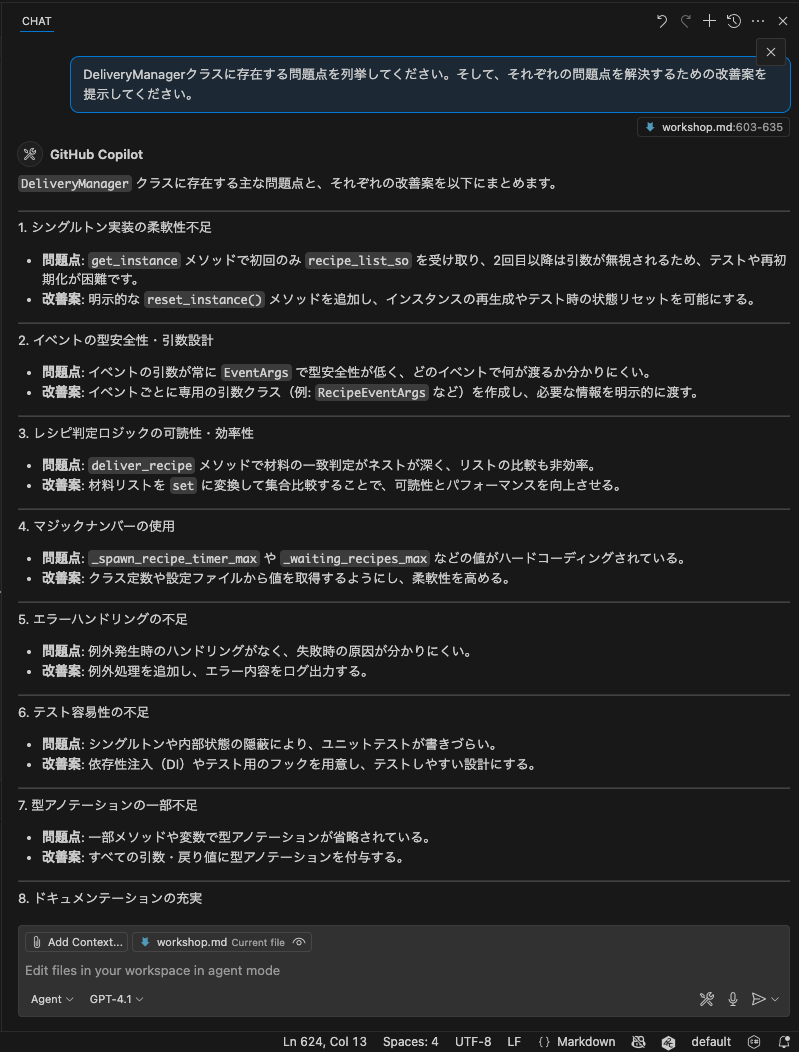
It should suggest multiple improvement points.
Try with Different Models
By trying the same question with different models, you can compare the characteristics of each model.
Implement Improvements
Now let's have them implement the improvement suggestions they provided:
Please implement all the improvement suggestions you presented.
Copilot will then make direct code changes to the code open in the editor. However, this is still at the suggestion stage, and the user decides whether to accept these changes. You can accept or reject by clicking the "Keep" or "Undo" button above the chat field.
Agent Autonomy
Here, let's check the comments returned by the agent. The agent didn't just follow instructions and change code, but may also confirm that errors occurred after code changes and try to fix those errors too. In an appropriate environment, the agent automatically detects errors that occur after code changes and attempts to fix them. In this way, agents can understand user intent and execute tasks more autonomously.
Confirm Command Execution
When using agent mode, Copilot may ask whether it's okay to execute commands. This is because Copilot always asks for user confirmation before executing any command. Check the command content, and if there's no problem executing it, click "Allow this time". This allows Copilot to execute that command and make necessary changes.
This section is optional. If you want to try more advanced features after learning the basic functions of GitHub Copilot, please proceed.
1. Prepare Branch
Step 1: Reset Staged Changes
Return all changes currently in the staging area to the working directory:
git restore .
Step 2: Create New Branch
Create and switch to the feature/pomodoro branch:
git checkout -b feature/pomodoro
2. GitHub Advanced Security (GHAS) Setup
By enabling GitHub Advanced Security's Code Scanning feature, you can automatically detect code vulnerabilities.
- Click the Settings tab in your forked repository
- Select Security → Code security from the left sidebar
- Click Set up in the Code scanning section

- Select Default (recommended)
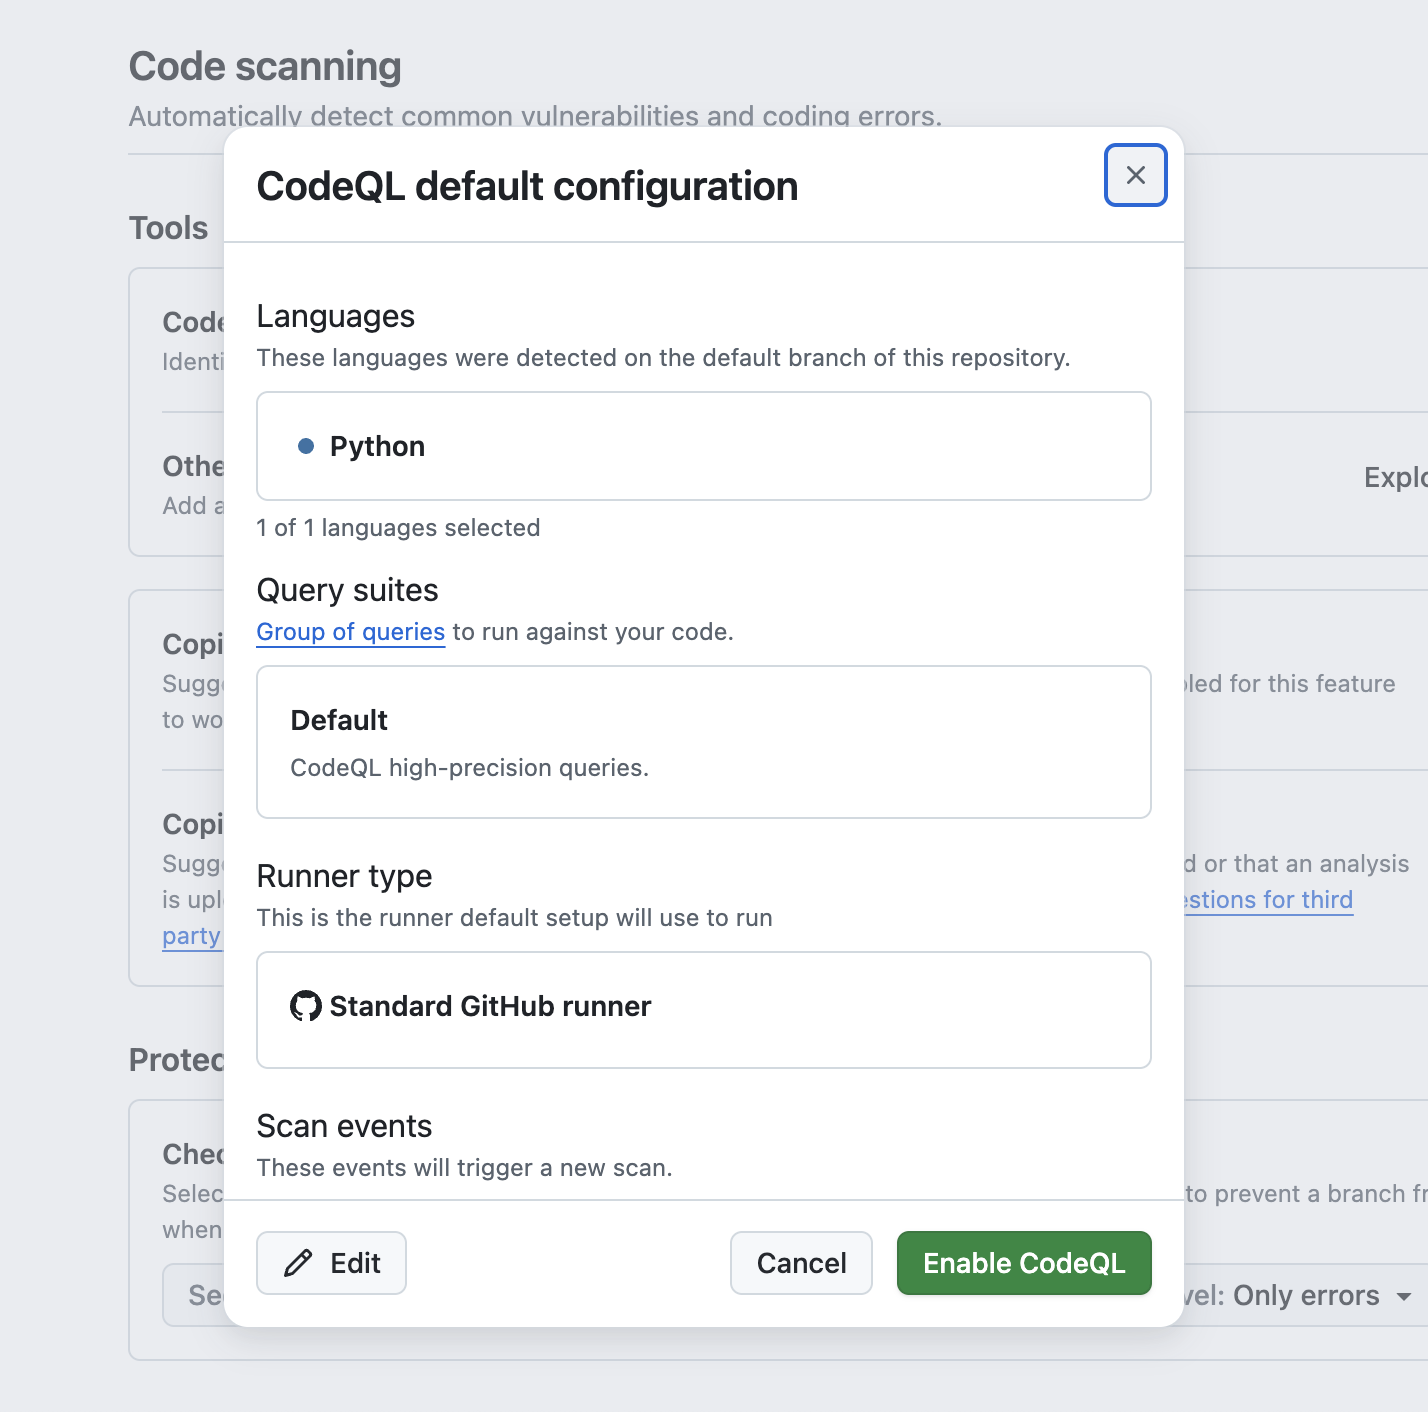
- Click Enable CodeQL
This will execute automatic code scanning when pushing or creating pull requests.
3. Verify Copilot Features
Let's verify the Copilot features available on GitHub.
- Click your profile icon in the top right of GitHub
- Select Your Copilot
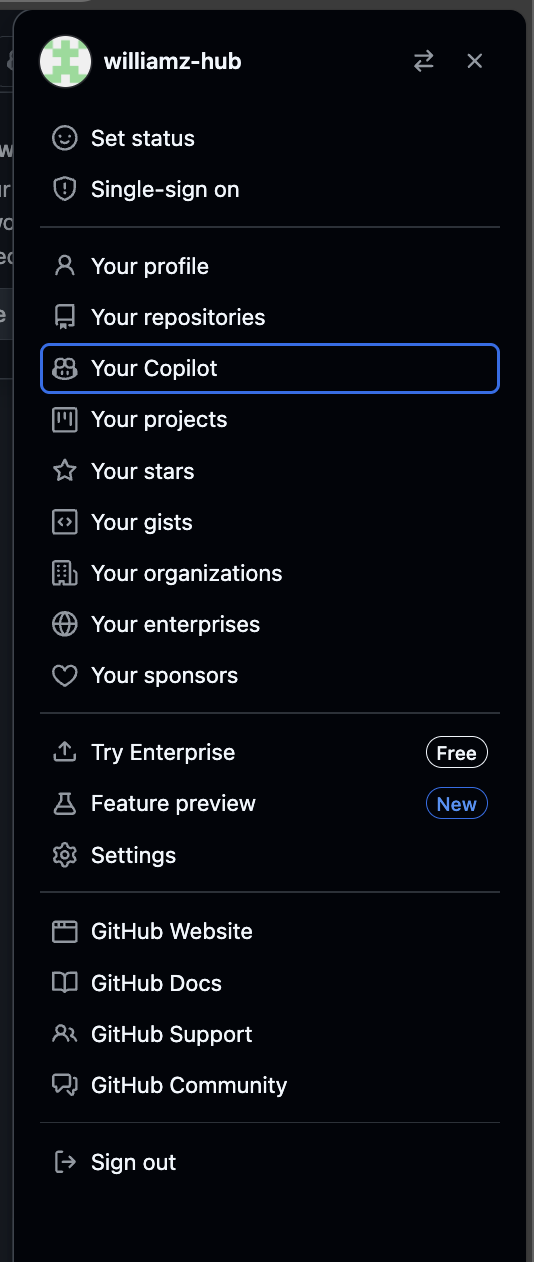
Confirm the following features are enabled:
- Copilot in GitHub.com - Use Copilot on the GitHub website
- Copilot coding agent - More advanced coding assistance
- MCP servers in Copilot - Use Model Context Protocol servers
4. GitHub MCP Server Setup
By using Model Context Protocol (MCP) servers, you can extend Copilot's functionality.
Step 1: Add MCP Server
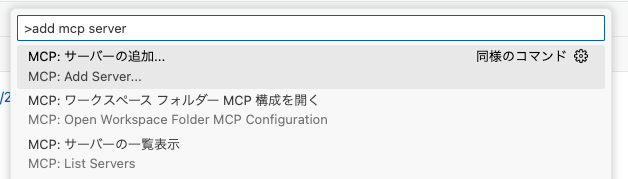
- Open command palette in VS Code:
Ctrl+Shift+P(Windows/Linux) /Cmd+Shift+P(Mac) - Type and select
mcp: add server
- Select HTTP
- Enter server URL:
https://api.githubcopilot.com/mcp/ - Enter
github-mcp-serverin the Server ID field (or press Enter to skip) - Select Save to this workspace for the save location
- Authenticate with your GitHub account
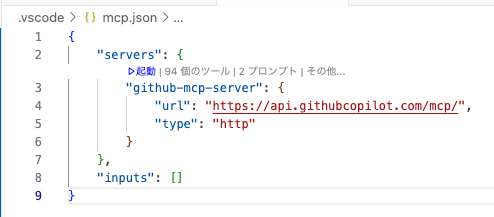
Step 2: Verify MCP Server Startup
MCP server configuration is saved in .vscode/mcp.json.
Step 3: Enable Tools
- Click the tools button in Copilot Chat
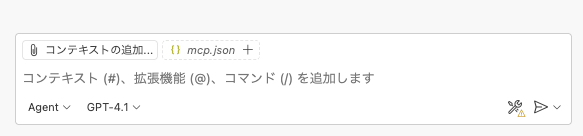
- Confirm the GitHub MCP server appears in the list
- Check the checkbox to enable
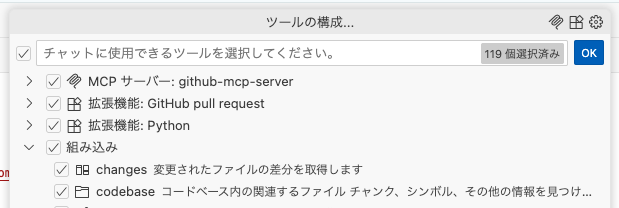
Now you can reference GitHub information directly in Copilot Chat.
So far, we've learned the basic usage of GitHub Copilot available in VS Code. Next, let's actually develop an application.
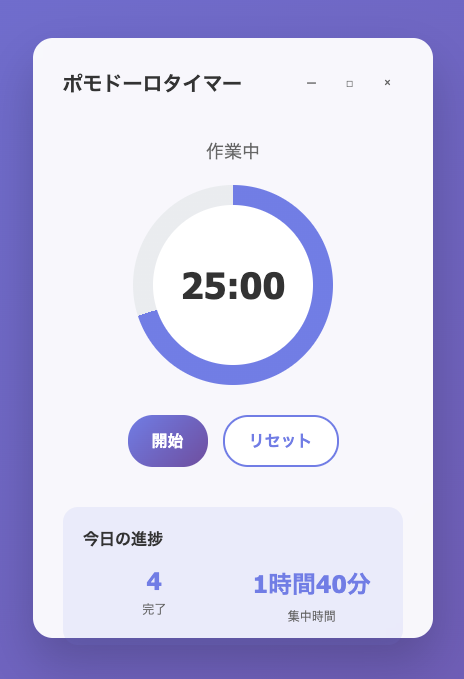
In this hands-on, we'll develop a Pomodoro timer application. This application has functionality to set work time and break time and manage timers.
We aim to create an application with the following UI:
Let's first create a new Python file in VS Code. Since we want to create this as a web application, we'll use Flask. Let's name the main file "app.py".
Project Overview
Create a web timer application for the Pomodoro Technique.
Required Features
- 25-minute work timer
- 5-minute break timer
- Timer start/stop/reset
- Progress display and statistics functionality
- Browser notifications and sound notifications
- Responsive web UI
First, rather than starting implementation immediately, let's consult with Copilot about what approach and design to proceed with. From here on, we'll proceed entirely in agent mode.
What's helpful when creating a web application with UI like this is Copilot Chat's image upload functionality. Using this, you can make Copilot understand your application's UI image.
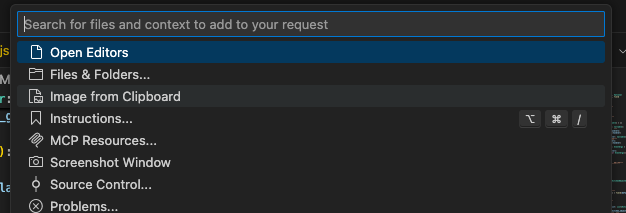
First, save the UI image from the previous page as pomodoro.png in the project root. Then, click Add Context in the chat field and select "Image from Clipboard" or "Files & Folders...". Then select the UI image.

Once the image is uploaded, it will be displayed in Copilot Chat.
Then, enter the following prompt:
We plan to create a Pomodoro timer web app in this project. The attached image is a UI mock for that app. What design should we proceed with to create this app using Flask and HTML/CSS/JavaScript? Please suggest an architecture.
It will then suggest a recommended web application architecture.
If there are points that should be improved or considerations that are lacking in this architecture, try pointing them out. For example, the following suggestion:
Considering the ease of unit testing, please also list any improvements or additions needed to the current architecture.
After this exchange, once the architectural design is settled, let's save that content to a file once. By doing so, you can reference the same architectural content even if you open a different chat session.
Since the architecture has been settled through our conversation so far, please compile a web application architecture proposal in a file called architecture.md in the project root, based on the content of our conversation.
Now that the UI mock and architectural design are established, let's consider what specific functionality needs to be implemented. Let's consult with Copilot Chat about this too. At that time, let's attach pomodoro.png and architecture.md.
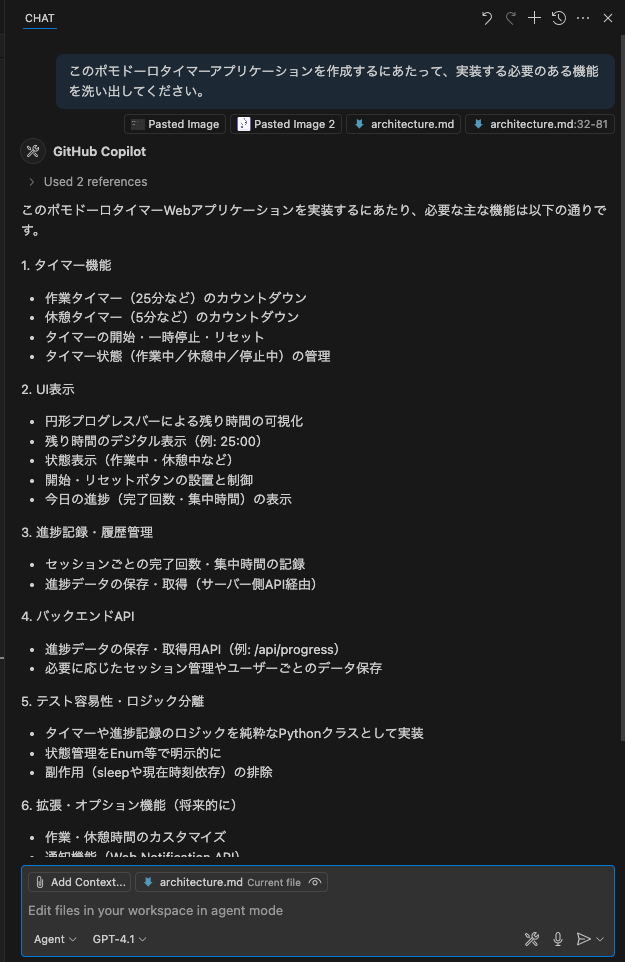
For creating this Pomodoro timer application, please list the necessary functions that need to be implemented.
Let's improve this content through chat with Copilot. Once the content is finalized, let's save this content in a file called features.md, just like we did with the architecture.
Thank you. That content looks good, so please write the list of functions that need to be implemented in a file called features.md.
Now we're about to start implementation, but a tip for mastering Copilot is not to try to implement large functions all at once, but to start implementing small functions first. This improves the accuracy of the code Copilot suggests and allows for smoother development progress.
Let's also consult with Copilot about what granularity to break down and implement this application development. Here, let's attach pomodoro.png, architecture.md, and features.md.
I want to implement this Pomodoro timer application step by step. Based on the attached image, architecture, and feature list, please suggest what granularity should be used to implement functions and propose a step-by-step implementation plan.
When I tried it, it suggested a plan consisting of 6 steps. If there are points you'd like to see improved, try pointing them out to Copilot. And let's save this content in a file called plan.md so it can be referenced later. Please think for yourself what prompt should be used to give instructions.
Now that all the preparation is complete, let's finally start implementation. Following the implementation plan suggested in the previous step, we'll implement functionality step by step.
Project Structure Preparation
First, let's create a project directory structure according to our architecture.
First, please modify the current project folder structure to realize an architecture like architecture.md. Move files and change configuration files as necessary.
Then, after attaching pomodoro.png, architecture.md, and plan.md, give instructions to Copilot like this:
Please implement step 1 of plan.md. If you need to move files that already exist in this project to different directories, please perform that work as well. If there are additional considerations needed, please ask me questions.
In my case, it asked questions that needed consideration as shown below. In such cases, provide the necessary information.
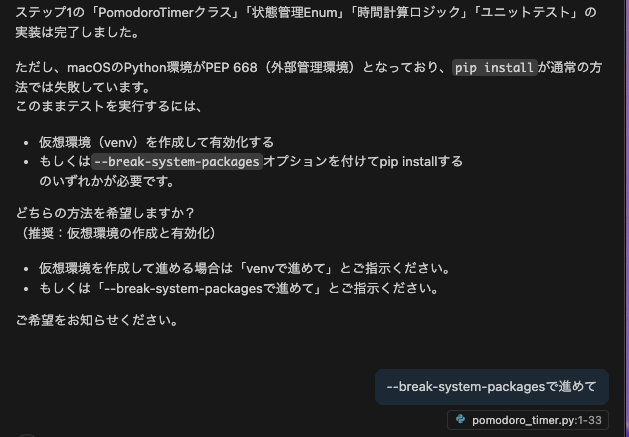
After that, Copilot implements step 1. Once implementation is complete, Copilot builds the project on its own initiative and checks for errors. If errors occur, it makes additional corrections to resolve those errors. This kind of autonomous behavior is characteristic of agent mode.
Once implementation is complete, check the following points:
- Directory Structure: Is it structured according to the recommended architecture?
- Basic Files: Are the necessary basic files (app.py, HTML templates, CSS files, etc.) created?
- Operation Check: Perform simple operation tests to see if any errors occur?
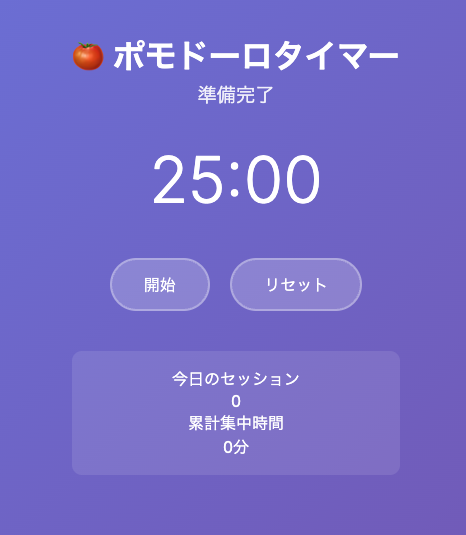
Below is the result of step 1 implementation in my case. What kind of application this becomes at this stage will differ from person to person.
Before continuing with implementation, let's write unit tests for the implemented functionality. By writing unit tests, we can confirm that changes in later steps don't affect existing functionality.
If unit tests are already implemented at the stage of the previous page, please skip this page.
Test Implementation
Try executing a prompt like this:
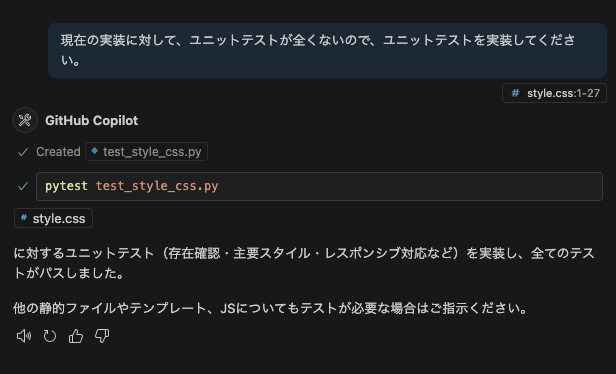
There are no unit tests at all for the current implementation, so please implement unit tests.
Copilot agent will then ask whether it's okay to use commands to install dependencies for unit testing. Like this, agents always ask for user confirmation before executing any command. Here, click "Continue" to allow execution of necessary commands.
Copilot then executes the previous command in the terminal within VS Code and installs necessary dependencies. Similarly afterwards, Copilot always asks for user confirmation before executing any command. If executing that command causes an error, the agent makes additional corrections to resolve that error.
This section is optional. Please proceed if you have already learned basic Copilot functions and want to challenge more advanced implementation.
From here, let's implement the remaining features step by step as a free exercise.
Here are some points that should be helpful.
When You Want to Give Instructions for UI
When you want to give instructions for specific elements on the UI, you can make Copilot recognize those elements by uploading a UI screenshot to Copilot. At that time, it's good to circle or draw arrows on the screenshot to clearly indicate which elements you want to give instructions for.
Alternatively, you can upload two screenshots - the current one and the expected one - to have Copilot check the differences and give instructions to get as close as possible to the expected UI.
When Giving the Same Instructions Repeatedly
When writing prompts or specifying context, if you're frequently giving similar instructions, you can have Copilot remember those instructions. Specifically, create a file called .github/copilot-instructions.md in your project and write instructions in it. When this file exists, Copilot automatically loads those instructions and can reference them in subsequent chats.
Below is a sample of custom instructions.
This project implements a Pomodoro timer with Flask.

The following are important files in the project. Please reference these files as needed for user instructions.
 - `pomodoro.png`: This is the UI mock of the application.
 - `architecture.md`: This is the application architecture document.
 - `features.md`: This is the list of functions to implement.
 - `plan.md`: This is the step-by-step implementation plan.
Additionally, by recording project-specific commands such as commands to build the project or execute tests, Copilot will automatically use those commands.
When Implementation Doesn't Progress or Bugs Can't Be Resolved
In such cases, try the following approaches:
- Give instructions to output debug information and have Copilot analyze that output.
- Try other models.
Let's commit the created code to the Git repository and push it to a remote branch. Here we'll introduce three methods.
Method A: Use Commands in Terminal
The traditional method of directly executing Git commands in the terminal:
git add .
git commit -m "Add Pomodoro timer functionality"
git push origin feature/pomodoro-timer
Method B: Use VS Code Source Control
Method using VS Code's integrated Git functionality:
- Open VS Code's Source Control tab
- Click the + button next to changed files to add to staging
- Click the ✨ button to have Copilot generate a commit message
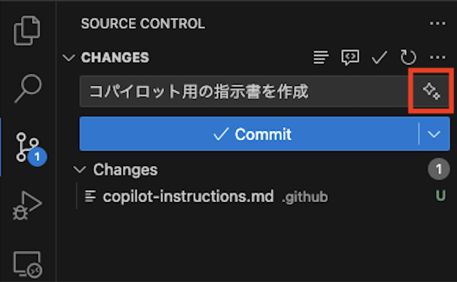
- Click the Commit button (blue button) to push to the remote branch
Method C: Use MCP Server (For Those Who Have Set It Up)
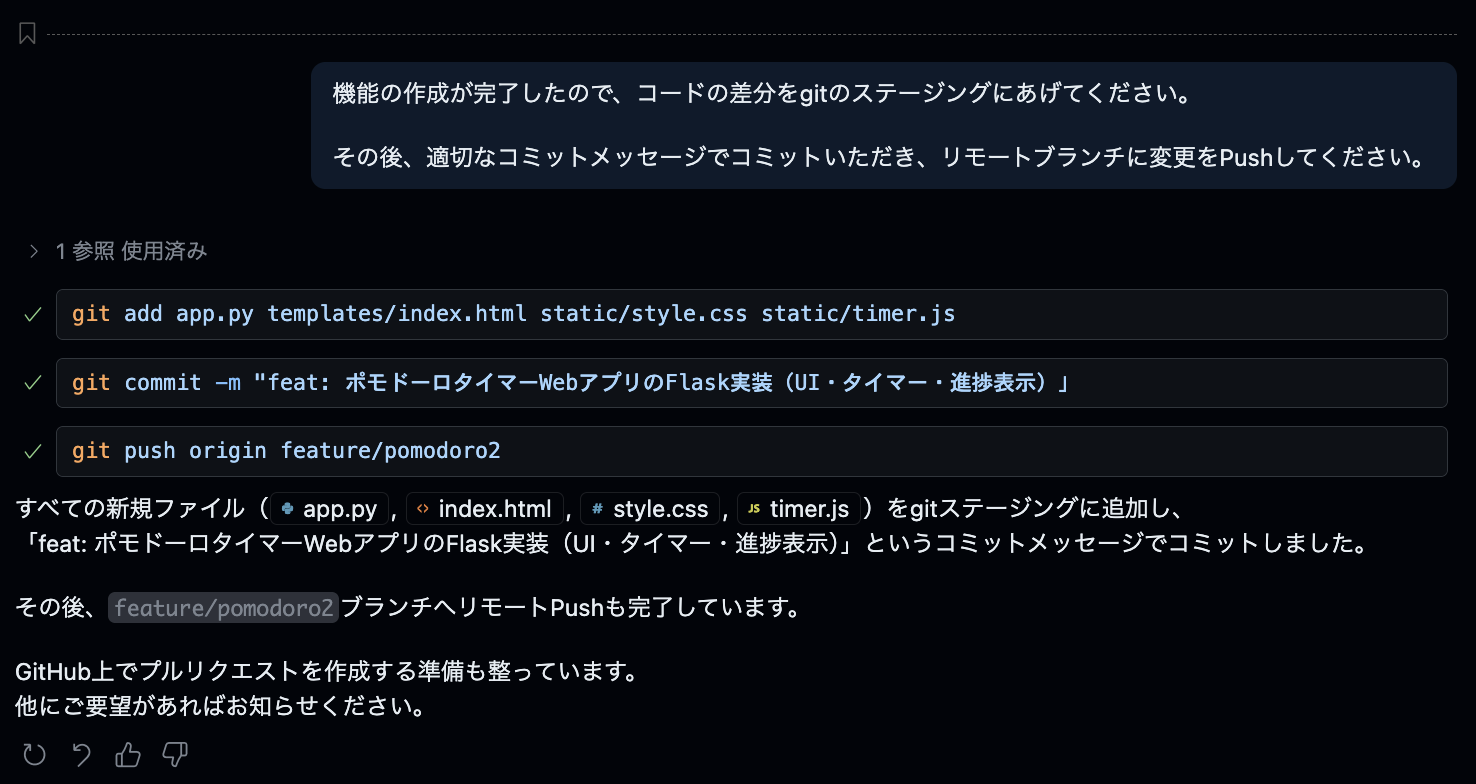
If you have already set up MCP server, you can give instructions directly to Copilot in agent mode:
Function creation is complete, so please add the code differences to git staging.

Then, please commit with an appropriate commit message and push the changes to the remote branch.
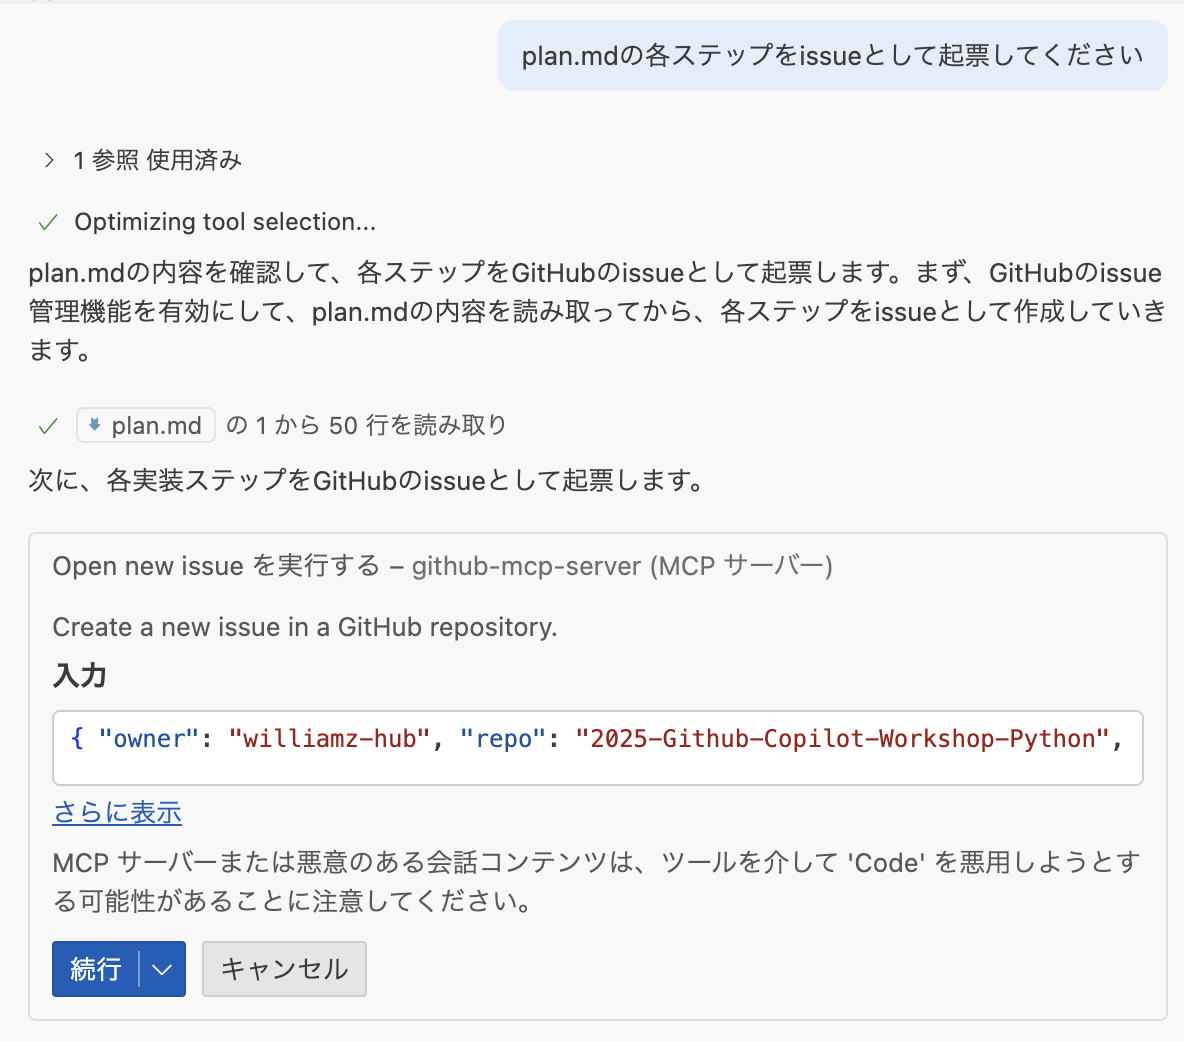
Next, we'll manage the implementation plan as GitHub Issues:
Please create issues on GitHub for each step in plan.md
This instruction will have Copilot execute the following:
- Read the contents of
plan.md - Create individual Issues for each step
- Each Issue will include:
- Step title and detailed description
- Requirements for functions to implement
- Acceptance criteria
- Appropriate labels and priority
This enables planned project management and agile development.
After pushing, let's create a Pull Request on GitHub.com and utilize Copilot's code review functionality.
Creating Pull Request and Copilot Summary
- Access your forked repository on GitHub
- Click Open a pull request
- On the Pull Request creation screen, click Copilot icon » Summary
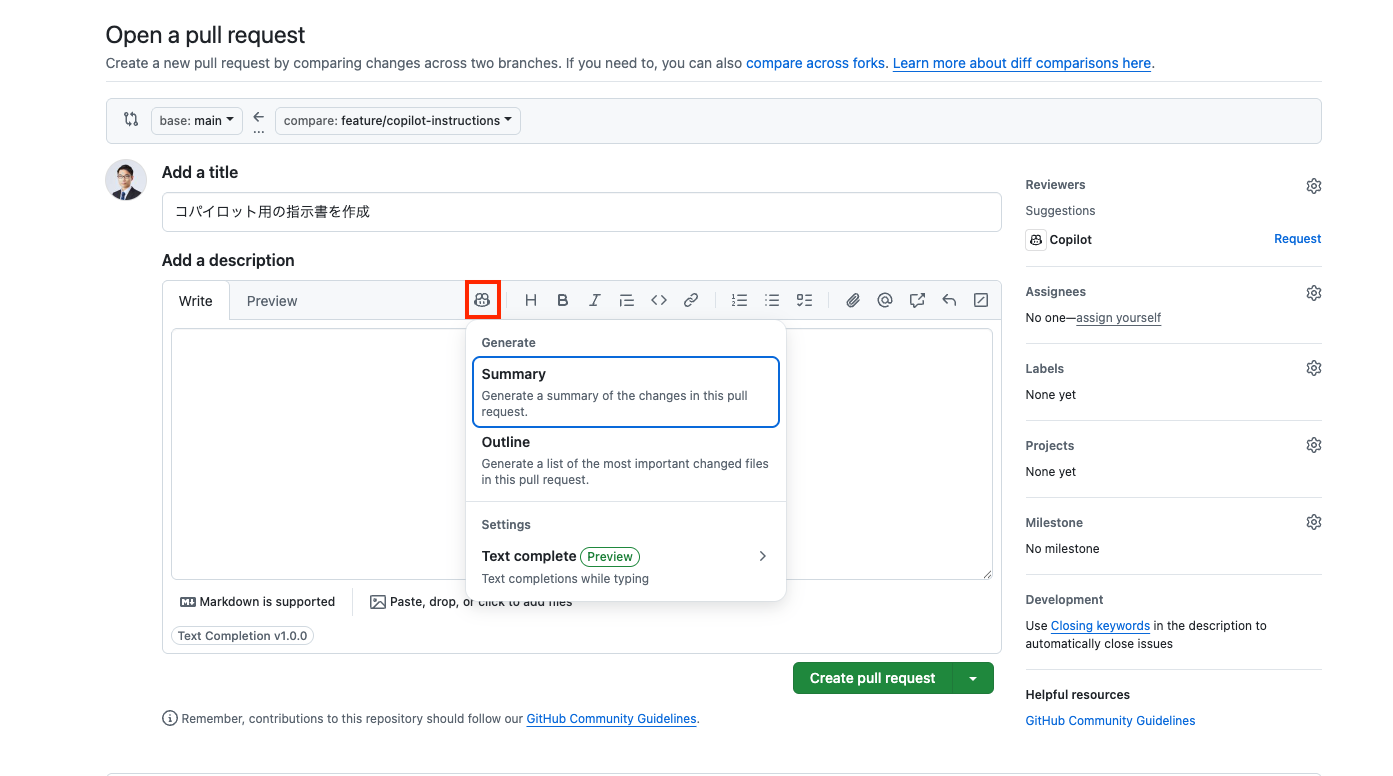
Copilot will automatically generate a summary of the Pull Request.
Assign Copilot as Reviewer
In the Reviewers section, you can assign Copilot as a reviewer to request code review from Copilot.

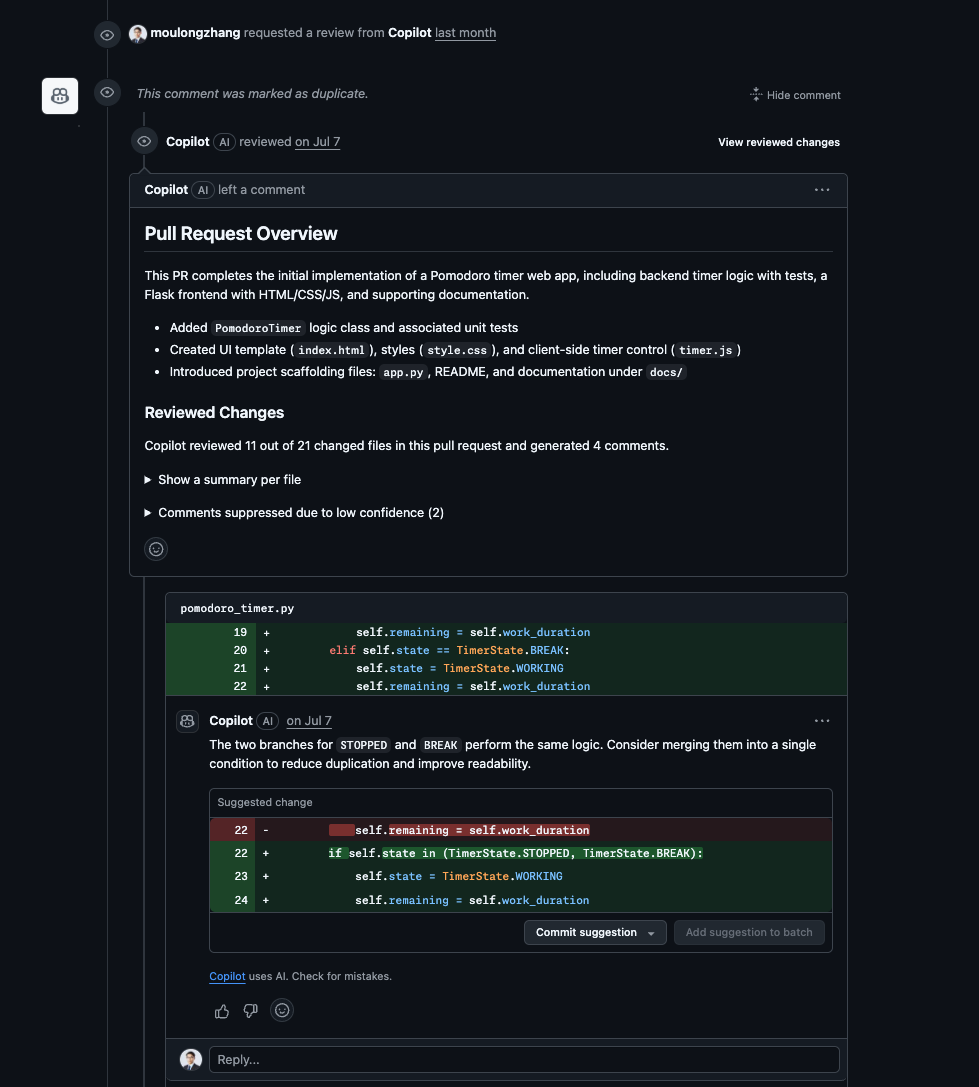
Check Copilot Code Review Results
After the Pull Request is opened, you can view Copilot Code Review results:
- Pull Request Overview: Summary of code changes
- Issues Identified: Pointing out potential problems
- Improvement Suggestions: Specific suggestions for improving code quality
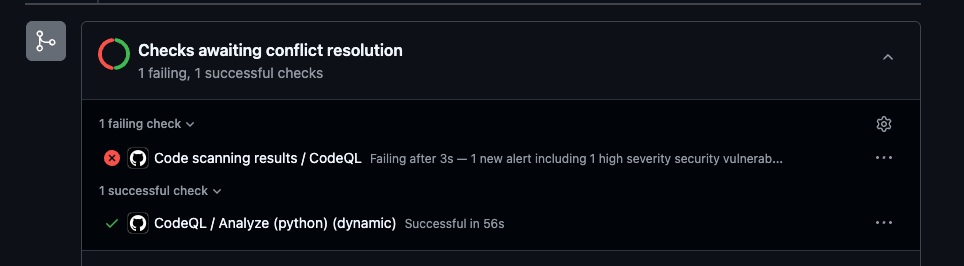
Static Vulnerability Scanning by GitHub Advanced Security
Pull Requests also display results from static vulnerability scanning by GitHub Advanced Security (GHAS):
Check Security Alerts
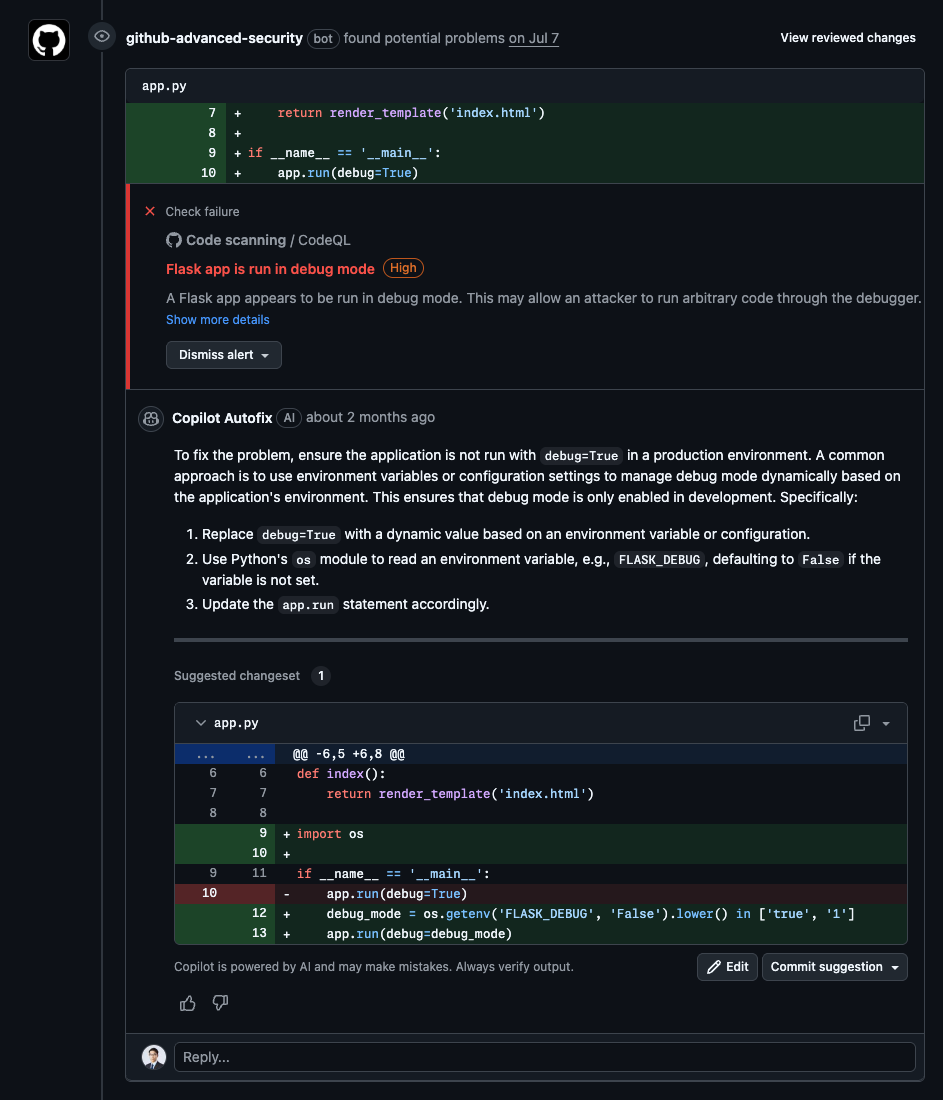
- High Security Vulnerabilities: High-priority security issues
- Copilot Autofix: Automatic fix suggestions by AI
- Detailed Explanations: Content and fixing methods for vulnerabilities
Detailed Check Results
Let's use the website version of GitHub Copilot to automatically generate project improvement suggestions as Issues and utilize Coding Agent.
Automatic Issue Creation with GitHub Copilot
- Access GitHub.com and click the Copilot icon in the top right
- Confirm your repository is added to the Chat context
- Enter the following prompt:
Please create 3 issues to customize the Pomodoro timer.
Pattern A: Enhanced Visual Feedback
Circular progress bar animation: Smooth decreasing animation based on remaining time
Color changes: Gradient change from blue→yellow→red as time passes
Background effects: Particle effects or ripple animations during focus time
Test purpose: Measure the impact of visual immersion on user concentration
Pattern B: Improved Customizability
Flexible time settings: Selectable from 15/25/35/45 minutes instead of fixed 25 minutes
Theme switching: Dark/Light/Focus mode (minimal)
Sound settings: On/off toggle for start/end/tick sounds
Custom break time: Selectable from 5/10/15 minutes
Test purpose: Measure the impact of personalized settings on user retention rate
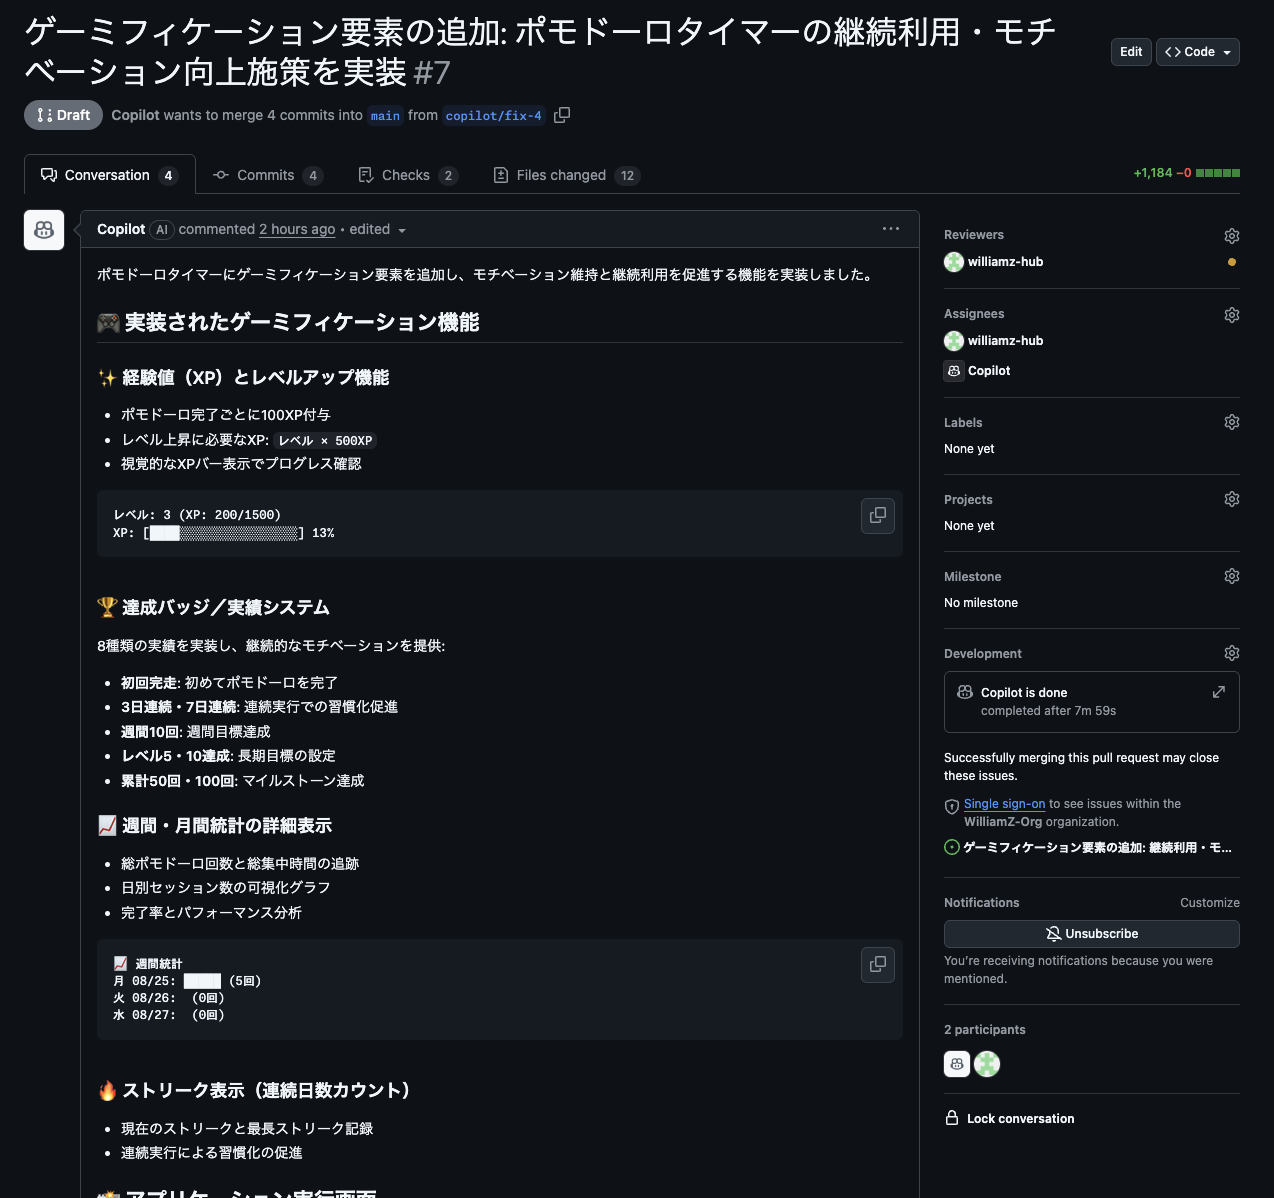
Pattern C: Adding Gamification Elements
Experience point system: XP and level up based on completed Pomodoros
Achievement badges: Achievement system like "3 consecutive days", "10 completions this week"
Weekly/monthly statistics: More detailed graph display (completion rate, average focus time, etc.)
Streak display: Consecutive day count display
Test purpose: Measure the impact of gamification elements on motivation maintenance and continued use
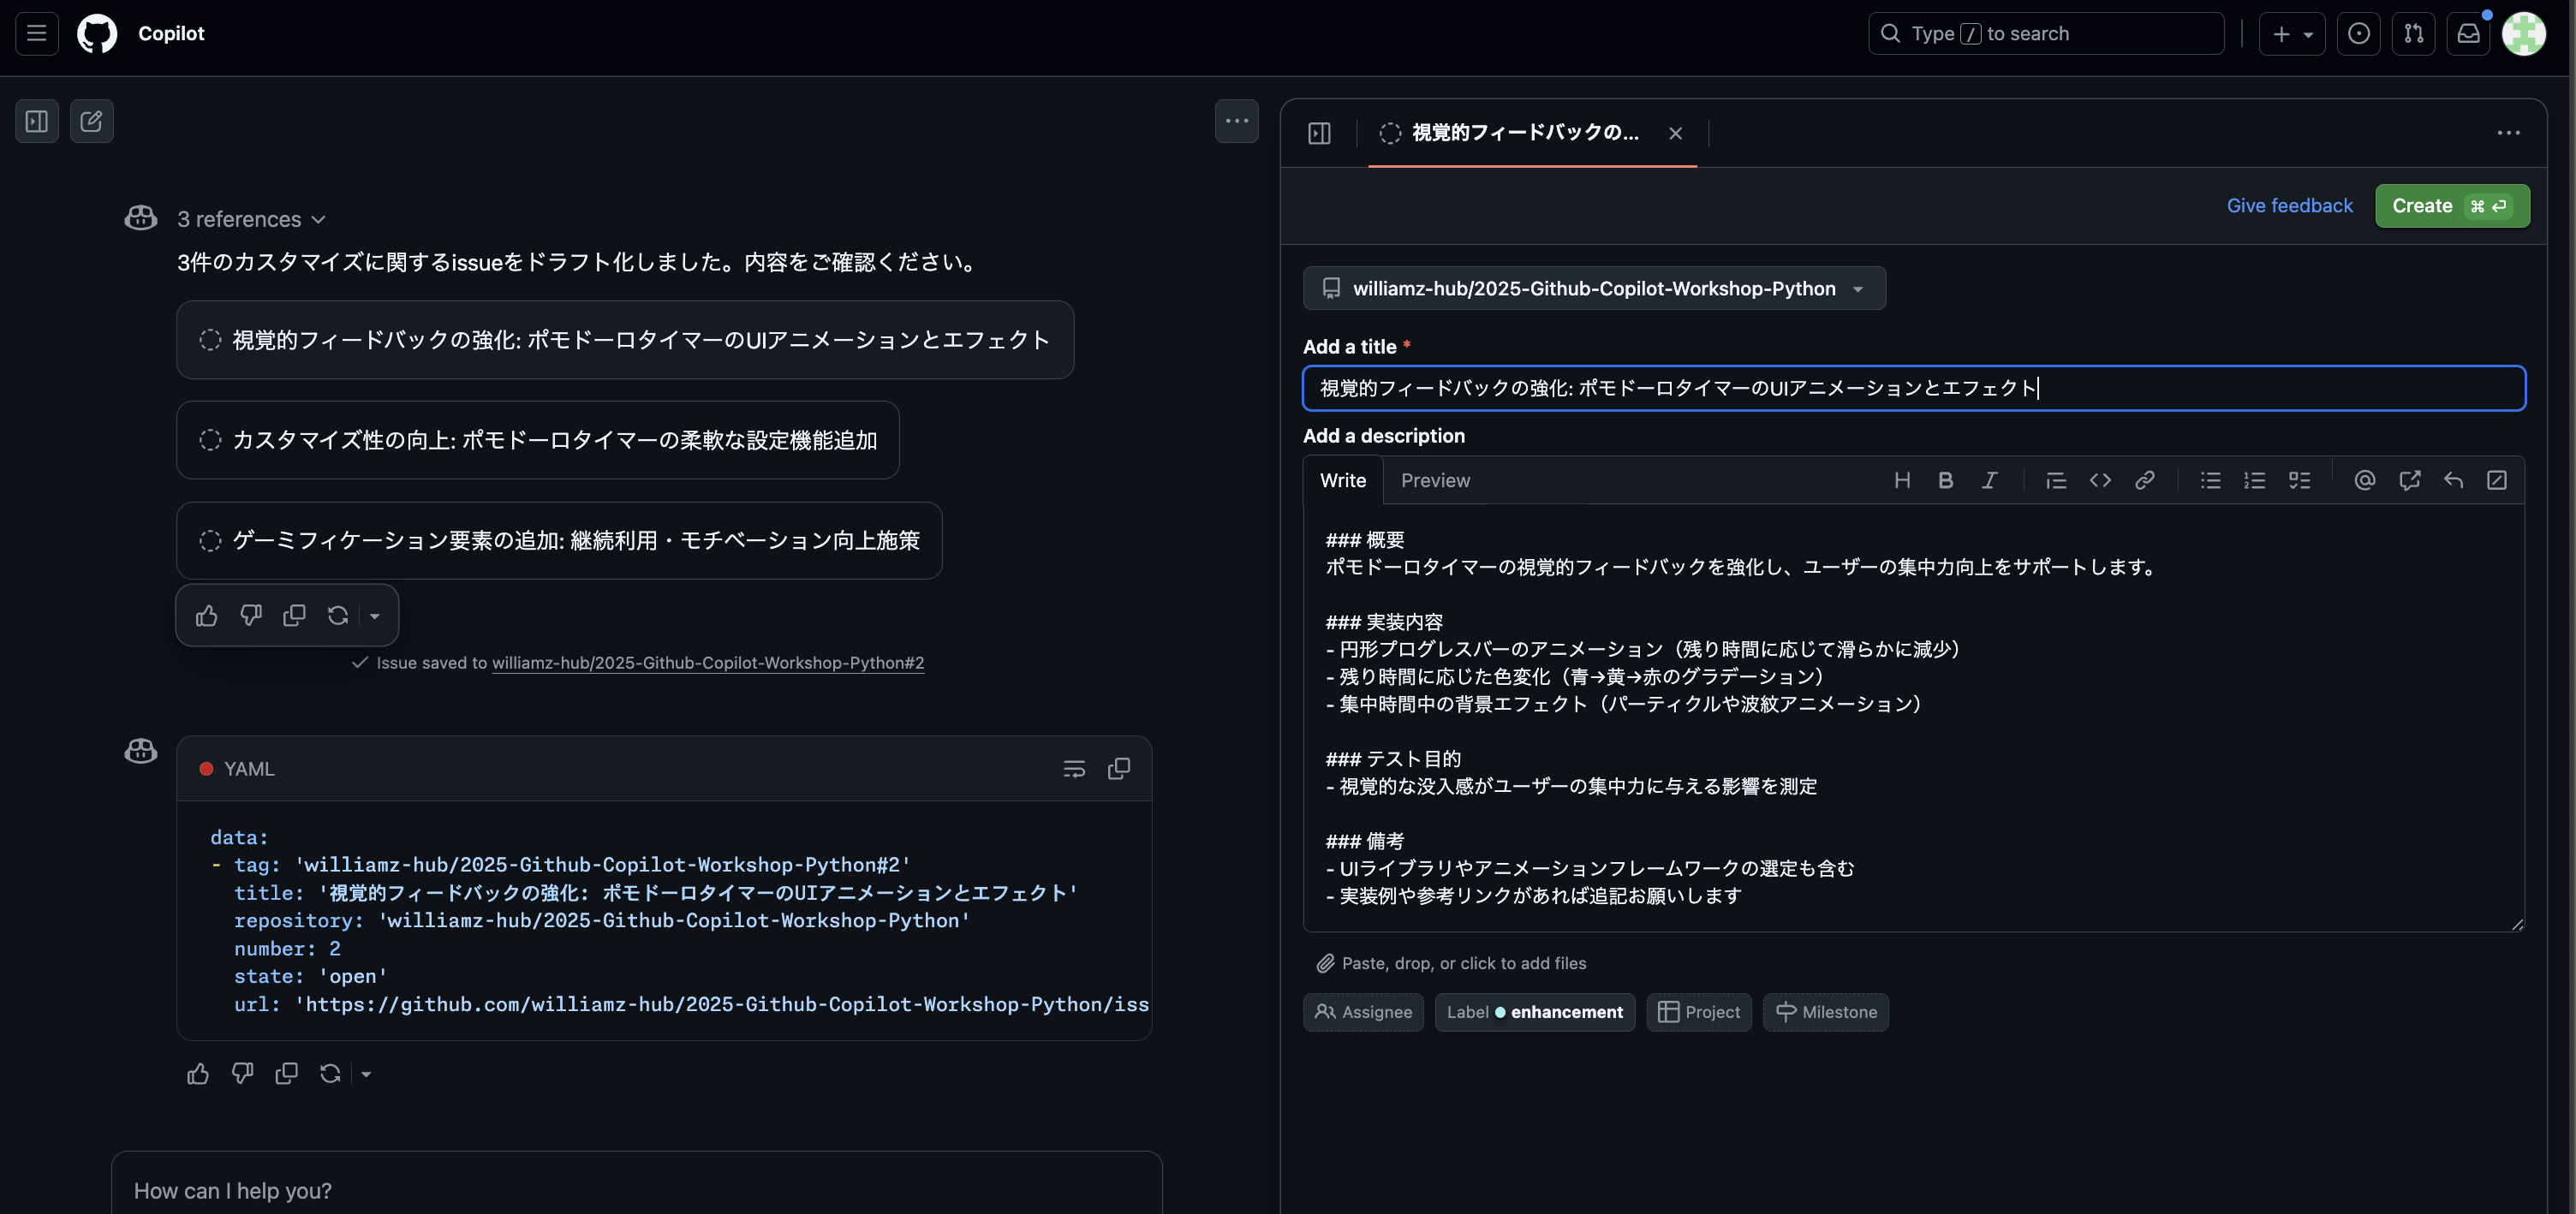
Issue Creation and Coding Agent Assignment
- Copilot automatically generates 3 Issues
- Review the content of each Issue and edit as necessary
- Click the Create button to create each Issue
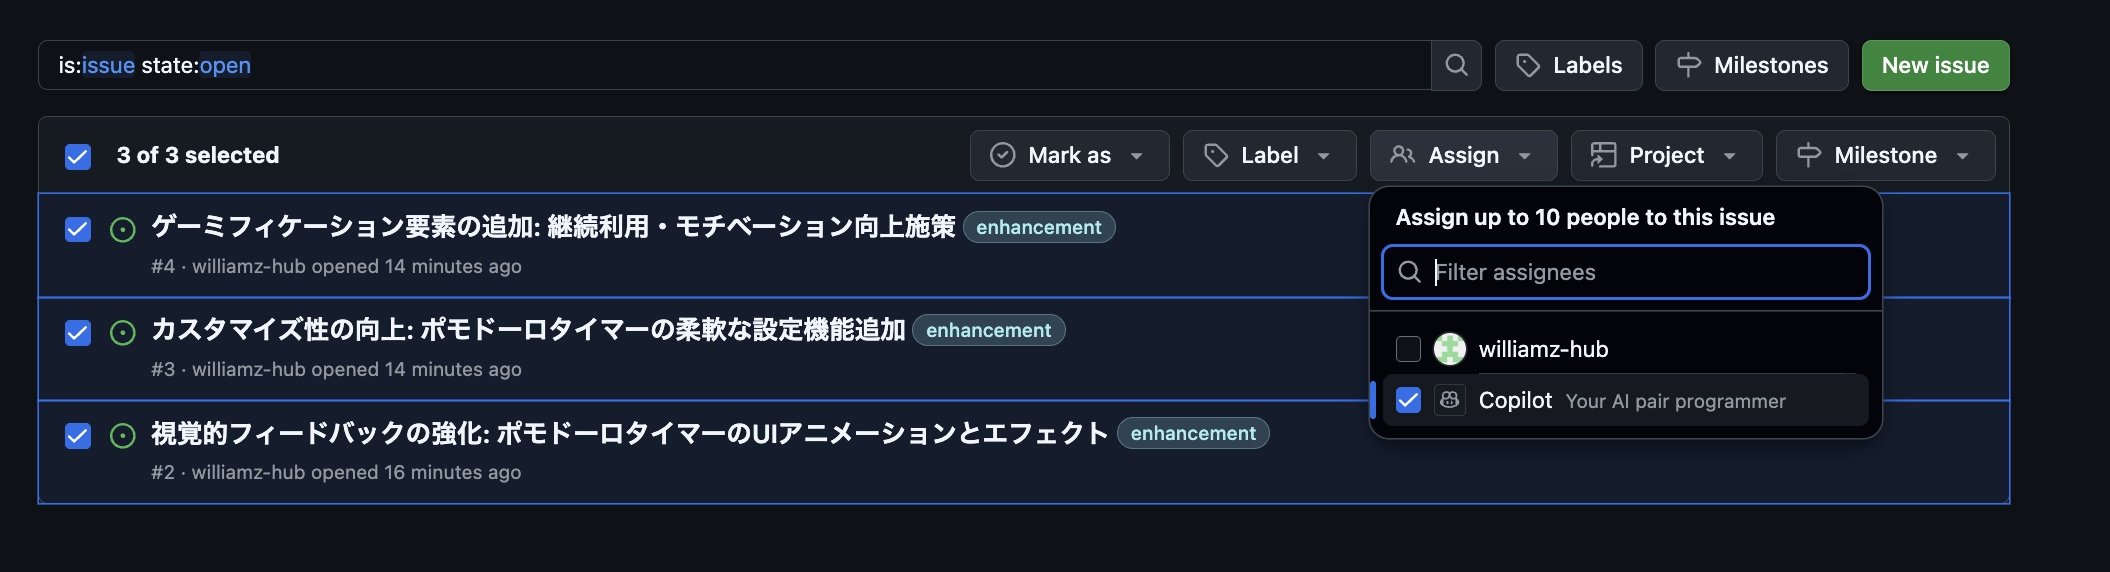
- After transitioning to the Issue screen, select Copilot in the Assignees section to assign the Coding Agent
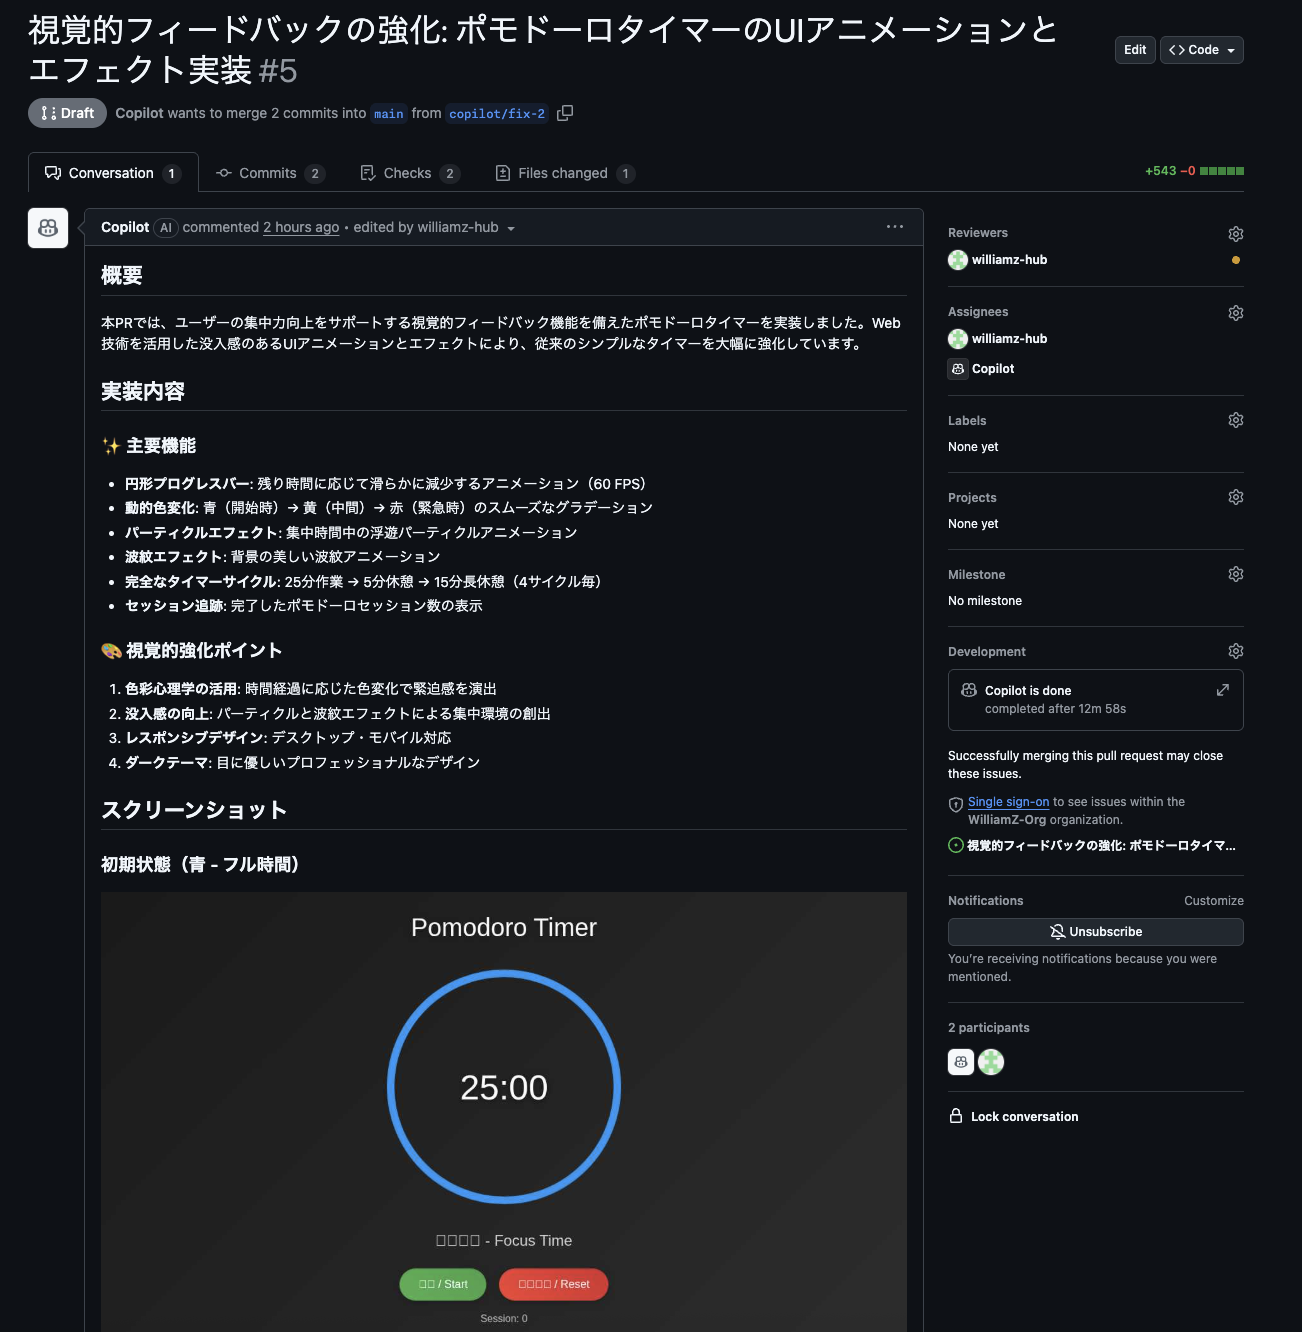
Expected Pull Request Results
When Coding Agent is assigned, the following results can be expected:
- Automatic Code Implementation: Function implementation based on each Issue's requirements
- Pull Request Creation: Automatic PR creation after implementation completion
- Comprehensive Testing: Including both unit tests and UI tests
Pattern A: Enhanced Visual Feedback
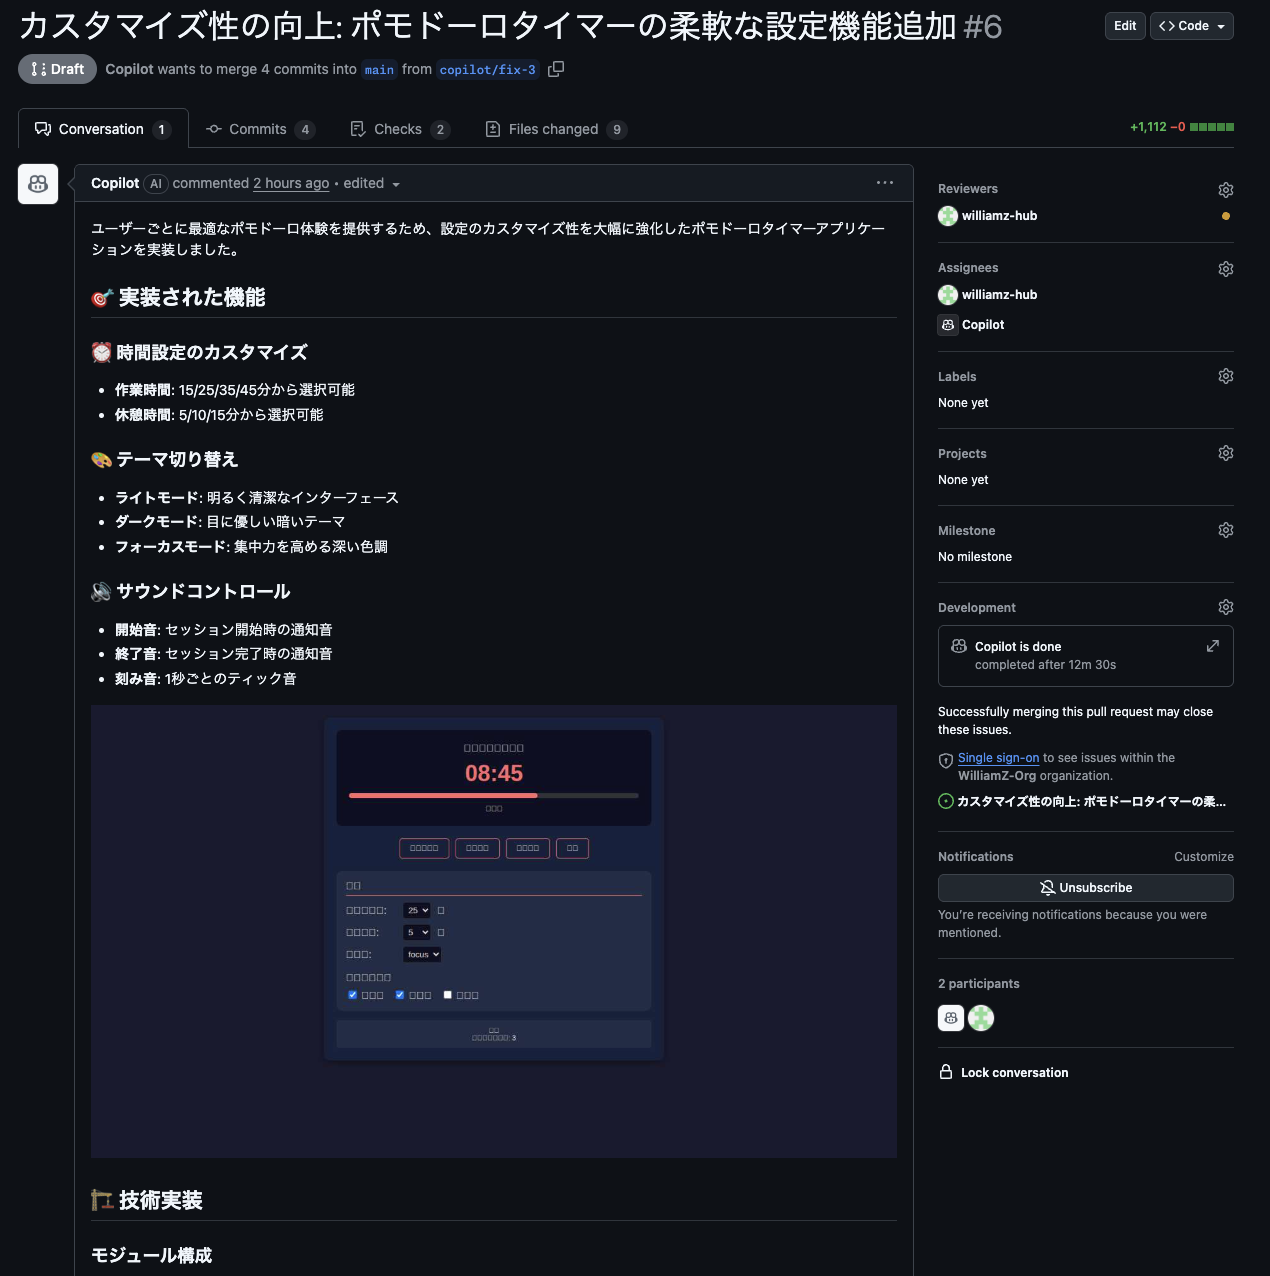
Pattern B: Improved Customizability
Pattern C: Adding Gamification Elements
What We Learned Today
In this workshop, we learned the following:
- Basic usage of GitHub Copilot
- Code explanation and improvement with Copilot Chat
- Utilizing agent functionality
- Copilot utilization in actual application development
Next Steps
- Try using Copilot in actual projects
- Challenge more complex application development
- Keep up with new Copilot features
Resources
Great work!